Untitled from Toby Rutter on Vimeo.
Thursday, February 24, 2011
Turntable Animation and thoughts on Portfolio
Being at Game On yesterday got me thinking about making sure I have a current portfolio put together, but this is a bit of a problem at the moment with so much of the work I am doing not yet complete and my previous work that is finished not representing where I am currently. I think this is the age old portfolio dilenma and only isn't a problem when the standard of all your work is to such a high level. But it has definately made me want to get the game project worked finished with renewed vigor so it can go into my portfolio. Yesterday I discovered that Maya has a snazy built in turntable function (huzzaah) which helps save a couple of minutes setting up a camera. So I decided to create a wireframe turntable of the Clip mesh from our game, so you can see the model in its entirety. I will be doing this for the five or so characters I will have finished by the end of the game project to start making up my modelling portfolio (they wont be in t-pose like this one I promise, as I will have had to rig them all for the game anyway). The idea of the structure of the modelling portfolio is pretty simple, there will be lots of turntables of the different characters (all posed) showing off the wireframes and the textured versions, and I will also get in some low poly assets that I am particularly proud of and fly throughs of my best environment work. This should produce a good bit of work to show for the time being.
Monday, February 21, 2011
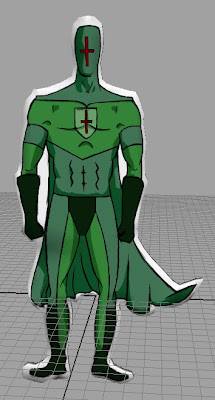
Cardboard Cutout Character
Crikey its been over a week since I posted any work up, this is rather bad really, especially as I have been doing lots. I guess my excuse is, and this is a common excuse for me, that I've been doing so much work its hard to take a break and actually blog it. But anyway a little catch up on my business of animation project, which has fallen on the backburner this week much to my annoyance. At the moment I'm just putting bits and pieces together, texturing, lighting and in the case of Isaac modelling. Once all this is out of the way I need to rig Isaac then I can begin animating, by which point I will have posted up some of my story boards. I have in previous posts done my best to explain this whole cutout style I'm going for, as part of an exercise in which I try and create more stylized work in maya. This post is about my superhero Character and will hopefully demonstrate pretty well how the cutout idea is going to look and work. I am really pleased with the effect and am really looking forward to finishing up the bullies and putting them through the process. I achieved this by doing a final drawing, scanning it into the computer, tracing the line art in photoshop to neaten it up, painting the colours schemes, adding shadows using the polygon lasso some bucket fills and a tiny bit of gausian blur, then opening up maya I used the image as a reference and built the character using the create polygon tool, I then triangulated it (I dont need good topology as its not deforming in the same way a 3D character will) then extruded it, created some uvs and applied the image. Simple. The characters remaining to be done in this style are just the bullies, babies pram and potentially a silhouetted crowd of newspaper reporters.

Sunday, February 13, 2011
A New Generic Henchman
It's been a while since the creation of my first generic henchman for the game, and what kind of evil baddy supreme overlord of evil would have only one kind of generic henchman to throw at passing heroes. The rubbish kind thats who. So anyhow working on similar themes to the first; battered clothing (this is after the apocalypse ya know), more armour as you go up the ranks of generic henchman, and something covering the guys face. There are several reasons for this; firstly faces are hard/ cant be bothered, only joking thats not the case, however faces do pose an interesting problem. If we are using the same types of henchmen over and over again surely the player is a) be happier killing wave upon wave of faceless enemies, as this still makes him feel heroic rather than a mass murderer and b) whilst it does seem vaguely plausible that all these henchman have the same ski mask or gas mask, it would be rather ridiculous for them to all have the same face. Anyway digressing and I want to keep this post short. In conclusion this guys is nearly completion he just needs a bit of poslishing, although not in the face department I really am very pleased with the gas mask, just need to get the rest of the body to that stage, adding deformation geomentry into the elbows etc.


Thursday, February 10, 2011
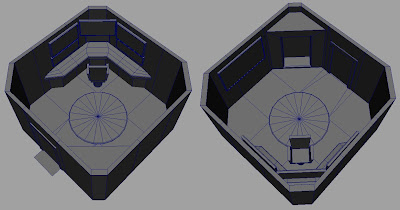
Superhero Hideout
Here is the work in progress of my superheroes hideout. The models is one room of the hideout as thats all you are going to see in the animation, as with most of the pieces I am building at the moment it won't see a lot of screen time. As a result its been a bit of a balancing act with not spending too much time on anything that is only going to be glimpsed by the audience. However with this piece I am very pleased with how its looking and how little time its taken me to achieve the look. There are a few more little things I want to do before I call the modelling stage finished. These include; adding buttons/ controls to the desk in from of the screens. Adding some more resolution/smoothing out the shape of the chair, as it is just a few cubes at the moment and finally adding a manequin in the alcove area that would hold the superhero's suit. I have also started playing around with the lighting in this room as I have a very clear idea of how I want it to be lit in the final renders.

Henchman Remodel
To the observant among you it may seem like I am just doing the same work over and over again, based on the number of times I have posted pictures of the same character models. I am currently working on the second of our games bad guys/ evil henchman. So hopefully soon there will be a slightly different model for you to look at. Anyway the reason I've gone through doing the third re-model in some cases is to make sure, now that my rig is finished, that my characters can actually move as well as the rig. I have been putting into practise on all my models a series of guidelines for better deformation geometry. I have also been going through and removing lots of unecessary polygons. The polycount for my characters for this game are much more around the ps2 standard. As I am not using normal maps and really high poly sculpting, the low poly meshes dont need to be pushing the 10k tris in order to convey the shapes and forms we want. Anyway thats all for now, I'm going to try and finish my level two environment by next wednesday (along with a list longer than my arm of things that need doing) So hopefully there will be quite a lot of activity on this space (and hopefully stuff that hasnt really been seem before.

Sunday, February 6, 2011
Beginning Production
I am currently working on the disney brief for my business of animation module, which is a really interesting brief which asks you to design a character that would be the main character is a 4-14 year old tv show and produce 30 to 60 seconds of animation involving this character. I believe I may have mentioned this but my memory is appalling sometimes. Anyway having taken a closer look at the brief I discovered the deadline for submission was the March 4th, at the time I realised this the deadline was only a scary 5 weeks away (and is now an even scarier 4 weeks!!!!) anyway it turns out we dont have to enter the competition if we can complete the work on time as long as we do complete the work for the assessment deadline at the end of the term. But being me I decided in a very stinson fashion to say "Challenge Accepted" and so have set out to finish my planned animation in time to submit. Last week was mainly a week focussing on pre production which has gone well but is not completely finished, so I decided to continue on schedule as start producing stuff necessary for the animation and keep working on the pre production at the same time. Here are a few of the set models that are currently in production.
This is Isaac's old house out in the suburbs before his family move to the city.
Isaac's new, big, scary, and also very incomplete city school
I am using these as part of the background in the city. I liked the idea of the further something is away from the character the model 2D it is, but I liked the idea of instead of just making it an image on a plane that I would give it some thickness as it gave the nice feeling of a stage prop, I've even been tempted to attach pieces to the back that help stage prop cutouts stand up. I plan on using this style a lot through the animation for things such as cars, buses vehicles and other characters. The reasons for this are at least two fold but I can only think of two right now. Reason number one: its quick, simple, easy and most importantly doesn't require rigging! Isaac will be the only character who is rigged. Everyone else will be a cutout (so one or possibly more drawings of them in different poses depending on how important they are). Second Reason: this is the snazy arty/narrative decision which makes it seem like I'm not just lazy. As the brief is only interested in the main character I wanted there to be a really big distinction between him and every other character. Environment and other characters are important, without them your characters become very flat, so I wanted people to see the people Isaac interacts with and where his story is set but make sure they are really focusing on him and that it is clear he is the main character.

This is Isaac's old house out in the suburbs before his family move to the city.

Isaac's new, big, scary, and also very incomplete city school

I am using these as part of the background in the city. I liked the idea of the further something is away from the character the model 2D it is, but I liked the idea of instead of just making it an image on a plane that I would give it some thickness as it gave the nice feeling of a stage prop, I've even been tempted to attach pieces to the back that help stage prop cutouts stand up. I plan on using this style a lot through the animation for things such as cars, buses vehicles and other characters. The reasons for this are at least two fold but I can only think of two right now. Reason number one: its quick, simple, easy and most importantly doesn't require rigging! Isaac will be the only character who is rigged. Everyone else will be a cutout (so one or possibly more drawings of them in different poses depending on how important they are). Second Reason: this is the snazy arty/narrative decision which makes it seem like I'm not just lazy. As the brief is only interested in the main character I wanted there to be a really big distinction between him and every other character. Environment and other characters are important, without them your characters become very flat, so I wanted people to see the people Isaac interacts with and where his story is set but make sure they are really focusing on him and that it is clear he is the main character.

Thinking about analysis
Thats right, I'm not going to sit here and analyse something for you, I am going to talkg about thinking about analysing something. But seriously, in our last business of animation lecture we were tasked with thinking of all the different elements that make up a piece that can each be examined and analysed in their own right. To put this into practise we had to, in groups, come up with a metaphor for a piece of animation, which included a different metaphor for each of the things that makes up an animation, ie sound, narrative etc. It does make sense honest. Anyway my group came up with the idea of a rainforest metaphor with things like trees, animals and rivers representing different but important bits that make up the entire piece. We did go a bit gung ho at various points and starting trying to think of things in the real world that matched up to things we just wanted to draw in the picture (with a sewage dump being pointless deconstructive comments on youtube). But overall it was a good exercise, the point of which was to make people, myself included, think a bit more when they come to analyse something in order to benefit their work. It will also stop being saying "I like it, cos its good" and claiming that that counts as analysing a piece of work

Thursday, February 3, 2011
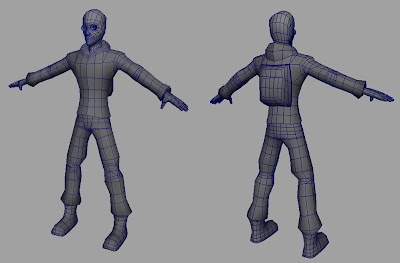
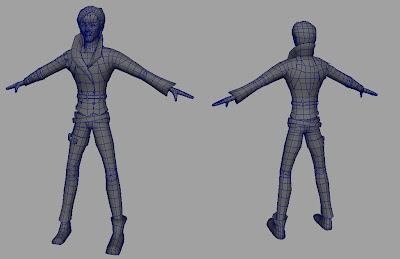
Clip Re-model
This is the third time I have remodelled this character, each time I have learnt something new about the process of character modelling, and will hopefully mean that future characters I create are much better from the start. The key learning points in this re-model have been creating geometry that actually deforms well when animated. This meant a lot of simple things really, making sure to have at least three edge loops on any joint which deformed, in the most case this was true for the old model, with the exception of areas such as the top of leg. The big improvements was mainly lowering the number of unnecessary polygons, the character is now as low as 5000 tris from just over 9000. At the moment he is looking more like a hi end ps2 character which I am happy with at this stage, I dont have the time in this project to be creating next gen level character models, sadly. Another big improvement was the accessories and how they sit on the model, I found some good advice that said accesories should either sit on top of verticies or match the edge flow of the body beneath. This way when skinned they wont intersect the model and maintain their position. I also spent some time time re-modelling the head, with much better edge flow the only issue is I am now not satisfied with how the head looks visually (which is annoying) but for now I dont have time to spend more time remodelling it again.

Level One Environment Work
This is an idea I had for a signal box that would feature in our abandoned train yard, which is the key area of level one. I saw an image of a signal box built above the train track and thought this was an interesting premise for creating an asset.


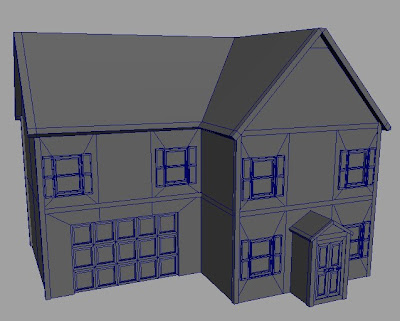
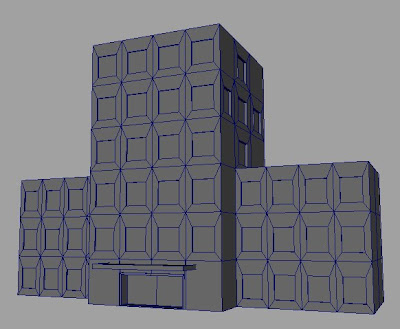
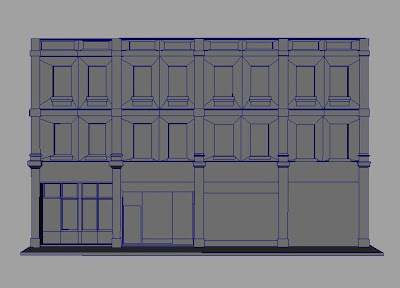
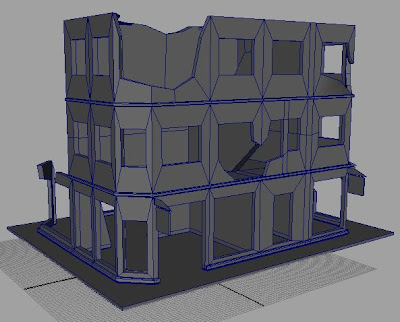
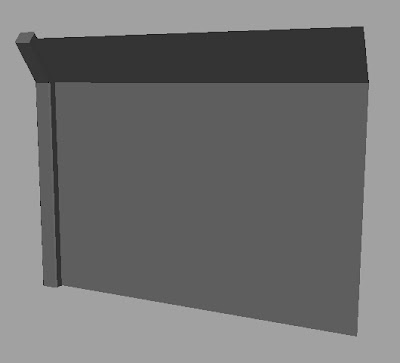
City Enviroment Work
If you have seen some of my recent posts you may have noticed I am now modelling the entire of our city level, which wasnt originally my plan, but it's been a fun challenge and architectural and environment modelling is definately one of my weak points, so it's definately worth practising. It occured to be that I have posted up big shots of the entire city at the moment but hadnt posted any of the individual buildings I built when I was just working on bits of level two. The ruined corner building was my first architectural endevour, I am currently getting all of the city up to a similar level and then going in and adding localised detail. The second building started from a reference image, the idea being that not all of the city would be free for the player to roam inside, for the sake of our sanity.


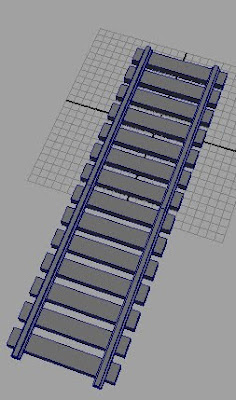
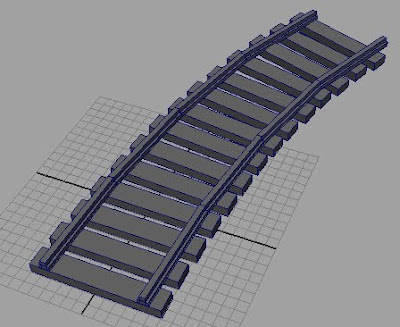
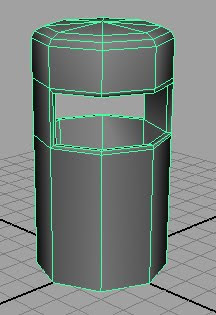
Low Poly Assets
These are another series of low poly assets that I have modelled in between other bits I have been doing. All of it is nice simple stuff with a low triangle count that can be reproduced multiple times with perhaps the exception of the train track sections which contains quite a lot of polys when its duplicated many times. The fence may seem like very little, but the beauty of it is that the texture does most of the work. For instance the plane section will just have transparancy and a painted image that looks like a barbed wire fence, this way the player cant get through the plane (as it will have a collider set to it) but will be able to see through it, without using a lot of polygons making each piece of wire in the fence


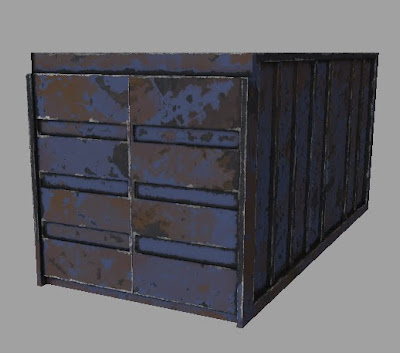
A few bits of texturing
A lot of the blog posts going up today are long overdue, I've been struggling to keep the blog updated in between working on projects. Anyway here are a few low poly assets and a little scene that I made for the game, the cargo container was the first thing I textured and has been used as an experimental process to learn how to texture better and what style of texture looks good for the game. Made issue with it is that it is still very early in the texturing process, there is plenty more I want to do to it once I can go into texturing in more depth, but at the moment I have lots of things such as entire levels that need to be built first. The little scene is an enlargement of the security booth asset I made, which I have just dropped some colour on and started to age.


Subscribe to:
Posts (Atom)