Sunday, October 31, 2010

A Vaguely Halloween-y Post

This really is only very tenuous link to halloween. This weekend (among many many other things) I have been preparing to attempt to teach some character modelling tomorrow, and whilst it has taken a bit of work I decided that I would use my time to come up with some concept/ reference images of an idea I had for a character (which tomorrow I shall attempt, and hopefully not fail, to model). The character is a real mix of influences (and I think would make a pretty cool halloween costume hence the tenuous link), originally the plan was to create a futuristic minotaur/beastman character. However I got a sudden urge to see what my imagination would think a witchdoctor/shaman character would be like if they were in a post apocalyptic genre (theres been a lot of the end of the world going on at the moment I apologise). Anyway taking a lot of influences from shamas, native american clothing, Rafiki (from the lion king) alchemists, gunslingers (a pair of revolvers) voodoo, captain jack sparrow (I imagined the character as being a cross between him and the weird voodoo lady, with a shed load of extra crazy and a messenger bag full of explosive stuff, alcohol and weird potions that were also very explosive). I also envisage him carrying a big stick (in the style of the native american dream/ story sticks) with the traveller esq bag on the end. I can also picture him hitting people with it. Anyway enjoy, hopefully soon I'll be posting some awesome pictures of the finished model


Friday, October 29, 2010

Update on modelling for next gen games

Works been getting pretty hectic at the moment, what with narrative work, drawing cubes for life drawing and all the concept stuff for the game (doesn't sound like that much I know) but finding time to work my way through all the other stuff I've set for myself (this next gen modelling practise, practising my digital drawing, escape courses, structure of man course, not to mention enslaved:odyssey to the west and team fortress 2's halloween special) its been feeling pretty hectic. But it is now the weekend so I can work without too many distractions. So I thougth I would take the time to finish up the tutorial on next gen character modelling, all that remains is the gun arm on the right arm and a one or two more pipes, the real challenge will come on monday when I am going to try and do a similar workflow for a character I need to design this weekend. The advantage is if the character ends up looking good then I know I am ready to start modelling characters for our game and wont feel quite so pressured to cram even more learning in before we start modelling, so fingers crossed. Anyway I have ranted enough and would like to kindly remind anyone who does actually read this that you probably have better/more fun things to do so just look at the pictures and move along


Wednesday, October 27, 2010

Character Concepts

We met up as a group again today to show the concepts we had been working on over the last week, and to start to finalise the looks for certain characters. We have now worked out a particular look for the main characters and there arch nemesis. I am going through and drawing out my interpretation of these looks, as are other people and in about a weeks time we should have some final designs. I decided it was time some of my work became digital so I draw up a base for the main character on sketchbook pro and copied it into photoshop where I started experimenting with different looks to find one I liked the best. Here is the progression. I like the last one the best, as it was largely all the best looking bits of the other sketches, and so I will start to use this as the concept I develope further into a final concept, then once we as a group have picked a finished character then the person who drew it will have to draw the characer from all the different angles we need as reference images.

Tuesday, October 26, 2010

Modelling for next gen games

I thought I would post my progress on the tutorial I am working on, which as the title suggests is giving me some more of an insight into modelling characters for next gen games (ultimately what I would like to be doing with my time). The character screen shot below is about half way though making the "low poly" mesh as it were. As it stands it has about 4000 triangles, out of the 10000 allocated for the model. This is quite a lot (equivelant of 5000 quads), but nowadays game characters are ranging from 3000 triangles anything up to 15000. Obviously depending on hardware and the engine they are running in. I began by blocking the character in with basic shapes and slowly adding more detail, the abdomen, waist and leg are still in their block forms and I am just starting to detail the lower arms. One thing that a lot of people have found strange about modelling for games is not pressing the "3" key in maya to see the mesh smoothed (this is a bad idea) as it effectively doubles your polygon count and normally gives you far too much resolution for one character. When making models for production this isn't a problem as all the rendering is done once (and providing you computer is good then alls good) however games are rendered in real time and so there are more considerations. Thats said it doesn't mean games can't look pretty (there are plenty of examples) it just means that whilst you might be limited to 10000 triangles there is a lot you can do with zbrush and normal maps to add extra detail, which will be the next step after I finish this base character. I may also have to remake the character with different topology before I open him up in zbrush.

Monday, October 25, 2010

Hmm that last one wasn't so "wee"

I thought while I was on I would add a small (I mean it this time) update on how Narrative Construction is going (well is the answer). Last week we were given a short passage and (after being shown how to) tasked with writing a screen play based on it. We were in groups of four and we really got down to the task, rather insanely though we had written over a page of screen play for the first sentance (hardcore I know). But I had a really good time of it, and some awesome ideas were suggested by Mo and thanks to Roshni for her previous writting experience. I would like to post it up here at some point but its all in celtx and until I can be arsed to re-write it (which means stepping away from maya for a little while (not likely) its not gonna happen.

Also a quick update on the overall task for this module, we were given a folder of sounds and for our final assessment we have to make an animatic for the an animation developed using sound as a starting point. The idea is we come of with the idea bit by bit over the weeks as we learn knew things about writing (we also have to write a screen play for the idea). I have came up with a basic idea, although basic as it is I think I may have decided too much so thats going on in my sketch books and things will start to pop up soon.

A wee update

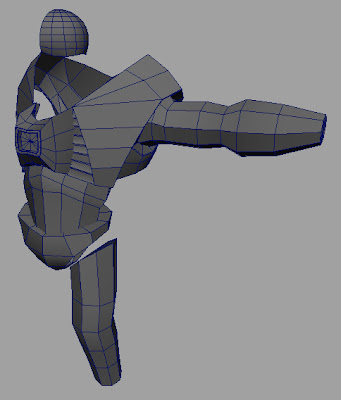
It feels like its been quite a long time since I posted anything up, shock horror this is a bit of a rare occurance. Anyhow I think the reason for this absense of posting is that most of the work being done on the game at the moment is all concept, and as a result is filling up lots and lots of pages in one of my endless number of sketchbooks. At some point (probably closer to assessment) I will scan lots of the concept drawing out of the sketchbook, or when references are finalised before I start modelling those images will make their way here. Anyway, I have once again digressed, in this post I am going to mainly blab on about 3D work (as just because we are doing concept work doesn't mean I have stopped tinkering with maya). At the moment I have been entering a "montage" state of training myself up for making the characters and environments we are designing, so I've been spending a lot of time practising the character creation pipeline, and trying to hone my topology skills (which takes a LOT of practise). I've been scouring the internet for tutorials, hints, tips and general advice that will eventually make my life much easier when it comes to making the finished game assests. And I've been a bit successful, in terms of tutorials 2 gnomon workshop dvds and a digital tutors dvd have proved useful, the image below is from the early blocking out stage of the character it is helping me make. I have also been finding various books that will help. And at some point in the near future I would like to read though a 900 page book on unreal developement. Things I've learnt, practise is important (very), dont be to clinical a large factor thats slowed my progress a lot is trying to find a definative topology guide for all male or female characters that uses all quads. There are two things wrong here, no character is the same (so no magic topology, you'll just have to adapt as you go) and secondly, I'm making characters for games, in the end the mesh will be completely triangles (hence why quads are gd each quad two triangles) but an excellent piece of advice was, when block and even modelling dont care about triangles (n gons still a no no) just make the shapes you need for the character you can clean up later, this makes you modelling way more free. Anyway I've blabbed on enough, when some of my character practises start looking good I will post some more.

Tuesday, October 19, 2010

Game Ideas Continued

A little while I posted a compiled image of various films and games that severed as some ideas for the dystopian sci fi game im working on. This post follows a similar thread, only this time the images are just ideas for the creation of the enemy soldiers, who although this hasn't been finalised yet will likely be part of a private military owned by either the corporation or government that is the oppressor in the game. I looked at lots of images of riot police, and swat teams to get a series of reference images that will be used when we are coming up with the concept art of the enemy soldiers and their uniform. The key things we will be looking at when making the concept art is making a slick uniform that looks a bit more futuristic than modern day (although we arent going to far into the future so there won't be to many "high" sci fi influences). We will also be arming the soldiers differently as the majority of these images are of riot police who are equipted with slightly less lethal weaponry. Aspects that I think look really strong that I want to keep are the gas masks and helmets giving the soldiers an oppressive, faceless and emotionless expression which I really like. This I think is a similar feel to that of the Killzone Helghast soldiers which are now I think of it a bit of a reference, however when I look for references I tend to try and base them within art or the real word (ie what the artists that made Killzone will have looked at) rather than the game itself.

Thursday, October 14, 2010

Base Mesh Work

So after speaking to the programmers yesterday and getting an idea of the kind of things we would be modelling for the game, at the moment its looking like we will be modelling the level environments, six main characters, enemy soldiers and a boss, I decided I would spend some time revising my human base mesh. I can then just adapt this mesh (add clothes, change features etc) everytime I come to make a humanoid character. So here is the head I have been modelling today (and a tiny bit yesterday morning) as a start to my new "heroic male" base mesh. Im pleased with it, although its not yet finished (a lot more tweaking needed) particularly because its modelled completely from the picture below it. Once I am satisfied with the head mesh I am going to start modelling into the torso and then arms, legs etc. Once thats all finished time to do a female mesh


Brainstorming

Yesterday I had my first meeting with one of the programmers that a group of animators and I will be working with for the next year. We sat down and had a very broad discussion about the game the programmers wanted to make and how we could help. They only had a very basic idea bout the game as they had only been working on it for a few days but it still gave us a lot to think about. We decided we should go away and brainstorm as many ideas and influences as we possibly could and then narrow down ideas out of this. So this is the first of what will be many brainstorming and ideas posts.

The basic idea we were given for the game was that it was to be a first or third person shooter. In which you played one of a team of soldiers/freedom fighters/protagonists who were battling a secret society/evil corporation/government.

Instantly I got a very dystopian feel from this idea.

dystopia: is a futuristic society that has degreded into a repressive and controlled state.

The programmers had suggested a slightly futuristic setting but no lasers (so not high sci-fi) but to me a dystopian setting set 20/30 years into the future seemed like a good place to start. It also gave us a lot of choice when it came to deciding the nature of the antagonists, whether the controlling factor in the dystopia was a Government, an all powerful company, or a secret society. So I've been going through looking up dystopian films/ games and just generally brainstorming based on what has to be one of my favourite sci fi genres.

Saturday, October 9, 2010

Character Update

The creation of this character is turning into somewhat of an epic saga, last night the character was nearing completetion (with colour map pretty much there, and a test of the first bump map working well), but then this morning came the twist in this tale. Upon attempting to test some more changes I had made to the colour map (I am now in the process of neatening bits and bobs up and removing any remaining seams) I was confronted by the rather startling error message "Fatal Error" followed by maya promtly crashing, and refusing to open the document. Now here is the moral of the story always use incremental saves! ALWAYS! This annoyed me as normally I do and I only had myself to blame, and I was a fool to think what can possibly go wrong I'm only applying a few textures, how young, and foolish I was. Anyone long story short turns out it was something weird to do with the texture that was screwing up maya, so I managed to import the geometry from the maya file, and deleted the material and now I'm back to where I was last night, a little bit further back but a lot wiser. But anyway I have digressed quite a bit from the point of this post, which was to post up a few images of the character with the nearly finished colour map applied, a screenshot of the colour map and any other random bits an bobs. So enjoy.


Tuesday, October 5, 2010

Character Test

Ok so in hindsight that problem was actually quite easy to solve, o well you live an learn. But this has just made me jump up and down (and possibly scream in a manner I'm not proud of). Here is a test of my first character with first colour map (please be not tooo scathing in the judgements it isnt finished yet) and once I've made some bump maps, specular maps, added some more details (scratches and dirt) and cleaned up the blindingly obvious problems of one or two (or more) texture seems. He will be finished and reading for scathing judgement (mainly off me). But this feels like a huge step for me, I've never managed to succcessful uv map anything this complicated (and it feels great to have achieved that) I have also never painted my own textures to this level. And this has given me a further realisation, I think I always knew that I really enjoyed the modelling aspect of maya, I can entertain myself for hours tweaking verts. But seeing a model even only as a test come to life when the textures are applied makes my day. I'm definately thinking games artist's jobs are looking like the job for me.


Hmmmm.....thats not right

This evening is a special occasion I have just applied a test of my colour map. But sadly I appear to have hit a bit of a problem, for some reason (I have know idea) the map is appearing... well like this (see below). This isnt the first time this has happened, everytime I have tried to apply something I have painted to a mesh (no matter how simple) this has occured, and its really bugging me, so on the off chance anyone knows how to solve or, and so you can have a little ganderat how spectacularly this has gone, I thought I would post i up, enjoy.

Monday, October 4, 2010

Ultimate Frisbee

Colour Map

Ok so here is an update on how the texturing is going. So far so good, I think its all going well although I won't really know until I apply the map to the mesh and have a look, but you learn from your mistakes so I'm not too worried. This has taken a little longer to post up, I didn't do as much over the weekend as I wanted (thanks very much team fortress 2) but I've made a lot of progress today and have finished blocking in all the metal panels and have nearly (over 2/3 the way there) started to do basic distressing on each panel. After this you can look forward to me going on and on and on about painting rivets, adding scratches where I dont think the model is scratched enough and generally dirtying him up. I am pleased with the look at the moment I was going for a really cobbled together feel and I think thats coming across. Once I finish the colour map I am going to create a bump map from it (to give the different layers of panels a sense of depth) and also a specular map (pretty important as hes made out of metal). There are also a couple of other maps I might try, I would like to do normal map/depth map, but I can see myself opening this mesh in zbrush so I might just make one using crazy bump from certain bits of the metal textures that I feel might need some extra detail. Anyway rant over, enjoy.

Friday, October 1, 2010

UV Map

Finally after what feels like hours and hours of work (well it was hours and hours but it feels longer) I have managed to complete my first successful attempt at UV mapping a character (and one I built from scratch no less). I've learnt a few things along the way, do whatever you can to make this process quicker/ more accurate. I think the next step will be to purchase UV layout ( a very good program which should help reduce the raw time required). But that said it hasn't been too bad using just the tools built into maya, I've been mainly using the unfold, and relax tools to spread the uvs, along with the uv smudge tool to move groups quite quickly and some one uv at a time adjustments. Theres also been a lot of cutting a sewing uvs in order to reposition seams, something I only really got the hang of towards the end so if I restarted again uv mapping from stratch I would probably get better results, but thats just down to the experience I've gained whilst doing it. Also something I've learnt has prompted a little internal debate as to what is the best way to start getting uvs for certain pieces. Now most things its pretty obvious and you can use the planar, cylindrical or spherical maps. But it the automatic map I have an issue with. You can specify how many angles it maps from but I find that it breaks parts down far too much forcing you to spend even more time piecing bits back together in order to have a managable number of pieces when it comes to painting the textures. This is a tool that if I do spend some more time using maya tools I will experiment with in order to better understand it. I might go back and have another wack at uv mapping my mech once I get through the texturing stage on this mesh, as I would love to see him textured.