Untitled from Toby Rutter on Vimeo.
Monday, May 23, 2011
Friday, May 20, 2011
Unreal Level Walkthrough
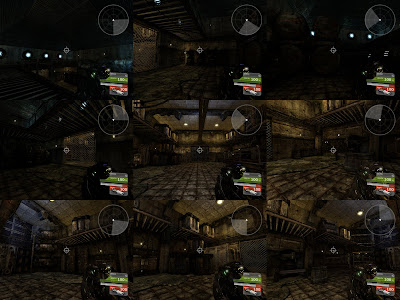
I posted up a selection of screenshots to try and demonstrate the work I've been doing in the unreal engine to familiarise myself with it, and I now feel very comfortable as an artist doing the things I am likely to be working on in there. However what I had really wanted to do was to take a screen recording of my wandering around the small level to show it off. So this evening I downloaded a trial for camtasia studios, it looks at little more professionl than having fraps in the corner of your screen. And set about recording the video. I have to apologise for the jumping, the frame rate I dont think is excellent as I recorded the video in full screen mode (which on my comps native resolution of 1920 by 1080 is pretty big) and seeing as it gets compressed down to internet resolution I would have been better running a smaller window to try and squeeze a better framerate out of it. All so unreal's camera tends to be a bit twitch-y with a sort of motion blur effect, I havent yet got to the stage of changing things like that so again I apologise. But all in all I am pleased with how quick I've been picking up the editor. I can create a rough bsp block out of the level, assign materials to it, populate the level with static meshes (the ones in the level are all from Unreal tournament 3) and light the level. I have also spent a lot of time looking at the material editor in particular because as an artist that is the area I am most likely to be spending time working on. I still need to spend a bit more time playing around with tools such as kismet and matinee. Matinee is a bit more simple and having animated in programs and used video editing it wont take long to adjust to it. Kismet is a new thing for my but has huge potential as its essentially a visual way of writing lots of events that normally would require code to implement. Anyway here is a quick walkthrough of my test level enjoy.
Untitled from Toby Rutter on Vimeo.
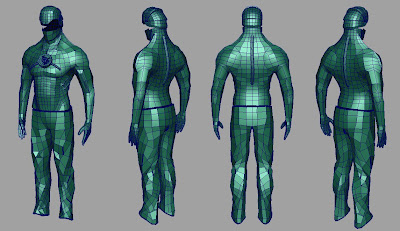
Low Res Mesh
Theres been a bit of a break since I last worked on this character, what with the game assessment and then a week or so between then and now when I didnt do much other than play Brink (I think everyone once in a while I can just about justify playing a game) and the time spent prepping myself for the hand in for Pre Prep for L6 Study on tuesday, hes fallen a bit to the wayside. But its high time it was finished so I can learn from the mistakes made, start the next project and improve. So to get the ball rolling I decided to stop working on the high res for now. As its in that perpetual state of tweakin where you can accidently spend hours not doing very much on it (which is highly counter productive). So to counter this I started making the low res mesh as all the base forms of the high res will remain the same its only little details and textures I am working on right now. This is my low res at roughly 4700 tris, so just under half the total budget for the character and its looking pretty nice. It does need a lot of clean up and some sorting out of topology but I like to make sure the topology is folling the forms of the high res nicely and then work out how to make that clean and orderly. This way I find the the normal map comes through that bit better. A key thing is prioritising where needs more polygons. For instance the low res boot mesh (not yet built) will be very low as there isnt loads of detail in that area on the high res mesh and its not going to be the centre of attention. The torso and chest piece contain a lot of detail and this should be reflected by both a larger proportion of the poly budget and also more uv space. Although it is worth mentioning you want the distribution of polys over the model to look uniform not really dense in some areas and very sparse in others. It's a fine balance to make work.

Wednesday, May 11, 2011
UDK
Recently Ive been spending a bit of time getting acquainted with the Unreal Developement Kit. Over the last year the game project I've been working on has been done inside the Unity engine and my experience with it hasn't been amazing, I'm sure if I was doing the project now I would be able to use it to much better effect. But having spent some time learning how to use UDK I have completely fallen in love with it. Here is a little example of a small test level I built using static meshes from Unreal Tournament that comes with the editor. Next step will be to design my own level and build my own static meshes (something I've had a fair bit of experience with). I did want to do a walk around of the level but I havent got any screen video capture software yet.

Monday, May 9, 2011
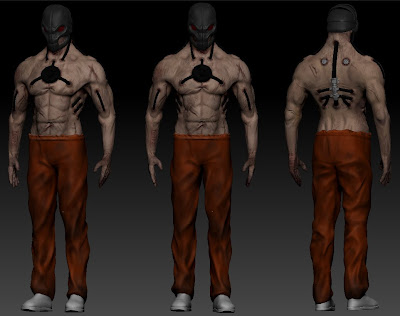
Heres some more work that I've done this portfolio piece, I havent been working on it as much recently as I had to take a quite break to get ready for the game pathway assessment, but now Im fully focussed on finishing him and starting on the next project. The polypainting for the skin is going well, I've worked in a similar way to how I painted the concept sculpt, really trying to get a very visceral feel, for instance I want the prisoner number tatto on his forearm to seem more like he was branded rather than tattoed. Ive played around with the trousers a bit I, I've been going for a prisoner jumpsuit look, thats had the top half ripped off, and has gotten all dirty. I'm going to go in a tatter the trousers up a bit more. The shoes still need details modelled on them. I did a lot of polypainting on the metal this morning particularly the chest piece but zbrush crashed due to memory problems so I lost the work. But having experimented this morning I know exactly what I am doing now so it wont take long to work back. That is my only beef when it comes to zbrush which is a program I really love, is that natively it's only only a 32 bit program and as a result can't take advantage of my 8 gig of ram only 4 of it. hopefully this will be fixed in the future, and also teachs be not to have mor than about 9 subdivisions on large mesh pieces. I am at the moment still experimenting with how I want to create his prosthetic arm, I really want to be very detailed and just feel right and while I've made progress with my experimentations nothing is quite there yet. For this model I may leave out the idea for now as I dont want it detract but I dont want to hold up the build for one item.

Game Pathway Presentation
Here are the slides from my game presentation, giving an over view of some of the things I've done this year. It reads left to right and top to bottom. Apologies for the size I had to scale it down to fit the image inside blogger file size restrictions


Wednesday, May 4, 2011
Game Animation
I'm going to point this out in MASSIVE CAPITAL LETTERS, I'm not really an animator. This is my diclaimer for anything that the following animations that I've been working on for my game project (everyone is being marked on doing some animation so I had to do some to cross the t's and dot the i's). Anyway thats not to say I don't know to animate I know about using graph editor, key framing and all the principles that we covered in the first year, it just isn't my favourite area (still ranked higher than painting skin weight eguhhhhgh).
We'll start off with something simple, the idea was the turret would stay dormant until the player entered a volume surrounding the turret, then if would start to scan the area, if a player entered a further volume and was in the turrent line of sight it would fire at him, as the player retreated or hid it would scan the area before return back into its "shell".
First attempt at a walk cycle, not too bad but needed polishing. Also I discovered that modeling a character in a traditional t-shape causes some weirdness when you try and bring the characers arms down to its sides.
Walk cycle with a bit more polishing.
Quite stylized run cycle, which I feel matches the slightly cartoony feel of the character. I wanted it to be a bit snappy but not tooo snappy.
We'll start off with something simple, the idea was the turret would stay dormant until the player entered a volume surrounding the turret, then if would start to scan the area, if a player entered a further volume and was in the turrent line of sight it would fire at him, as the player retreated or hid it would scan the area before return back into its "shell".
Untitled from Toby Rutter on Vimeo.
First attempt at a walk cycle, not too bad but needed polishing. Also I discovered that modeling a character in a traditional t-shape causes some weirdness when you try and bring the characers arms down to its sides.
Untitled from Toby Rutter on Vimeo.
Walk cycle with a bit more polishing.
Untitled from Toby Rutter on Vimeo.
Quite stylized run cycle, which I feel matches the slightly cartoony feel of the character. I wanted it to be a bit snappy but not tooo snappy.
Untitled from Toby Rutter on Vimeo.
Subscribe to:
Posts (Atom)