Rig Version 1
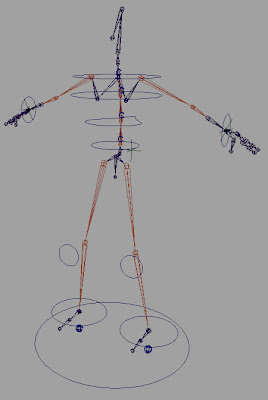
This was very much my first forray into rigging, well properly anyway during introduction to digital I did experiment with joints and ik handles trying to make a robots arm strum a guitar. The main features of this rig was an ik handle with pole vector to control the legs, with the pole vector controlling the knee. This I did right and will remain in all of the future rigs that I am talking about. Legs are definately something you want to move with iks, you just grab the controller at the ankle and move it and the knee moves in response, then the pole vectors there if the character needs a little tweak. Feet however used a method that was incredibly basic and didnt make it any further than rig version one, however it did start to teach me set driven key and how to put limits on controllers which were useful lessons to learn. The way this little controller underneath the foot worked was that you would move the foot forward or backward to change the rotation of the foot between two point (30 and -30 degrees I think). This was simple but worked, however it was clear from animator feedback that they wanted a realistic looking footroll so I set out to find out how to do that. The head and neck had absolutely no ways of being controlled in this rig, a major downside to it, the was later rectified, unsuccessfully several times. Finally the arms, these used an ik handle again, similar to the legs. This method stayed in a few versions of the rig, and half stayed in the final one. In order to try and create a realistic rotation of the wrist from the forearm, created a joint between the elbow and wrist, in order to get the ik to still work from the shoulder to wrist this required a bit of playing around but I got it there. The fingers also had no method of being controlled in this rig other than by manually selecting the joints, I also only had two fingers and a thumb, the theory being that one rig finger could control to real fingers. One of the main flaws of this rig and also several future rigs was that I didnt yet understand joint orientation and that translating individual joints to put them in place caused a serious offsetting of the joints orientation, sometimes causing the rig to move and behave in rather unusual ways.

Rig Version Two
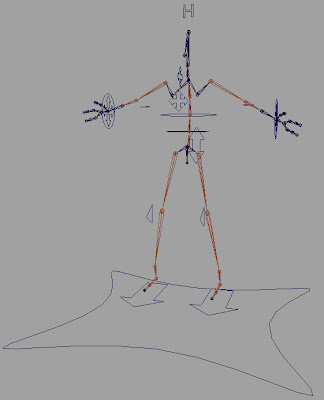
Method of controlling the leg remained the same and successful as ever, win. First major change, footroll, as per animator request I managed to incorporate a foot roll using more set driven key, which I was slowly getting the hang of along with the connection editor. The idea being that the foot controller moving the leg ik also had a custom attribute that controlled foot roll, by scrubbing between different values the foot went from default position to heel angled back, to the ball of the foot on the ground with heel raised, to the bare tip toes on the ground and the rest of the foot in the air. This for a while worked well. Spine rigging method remained the same, I also created a controller that the root joint was parented to which allowed for the character to be moved up and down and also get some hip movement. arms remained fairly similar, they were slightly better oriented in this rig cause for a better movement, however I did a a seperate controller for rotation which cluttered things up quite a bit and made somethings more complicated. Other controller changed include the controllers for the upper body to be different shapes so they could be more easily selected. Finally I include a head controller, and it was a monumental failure. It managed to seperate the head from the hierarchy of the spine meaning when you bent the spine forward the head stayed in the original position forcing you to reposition it by hand making it hard to be accurate and create realistic head movement (we had a lot of rather large head bobbing going on).

Rig Version Three
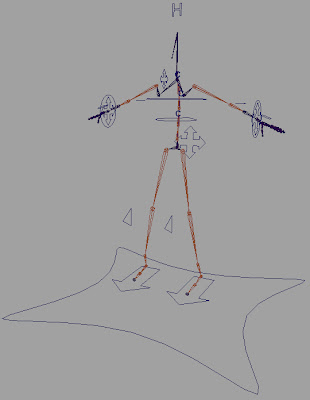
This rig update is a bit shorted as it was never completely finished. I remade a lot of it using the existing working (ish) methods, so same leg and foot set up, although I did want to find a way of creating better control in the foot. The spine and the arm set up remained the same, the big change however was that a) I added the correct number of fingers, and b) I actually found how to control them. So add to the rig a controller over the back of the hand with custom attributes using the connection editor and set driven key to control each fingers individual curling and spreading attributes. After trying many different ways including: constraining. a controller to each joint in the finger (incidently the same method I tried with the head, no surprises it failed), attempting to using ik handles, ik splines, and probably more crazy things out of sheer desperation, it was a huge relief to finally crack how to animate fingers. I was also going to try and resolve the head issues in this rig but it was towards the end of this rig when I found some very good tutorials by Dennis Jenson that suggested some far better methods for stuff I had previously done. So instead of messing around with the head some more then skinning the rig only to discover it didnt work as well was the next one would I thought I would just move straigh on and save myself some time.

Rig Version Four
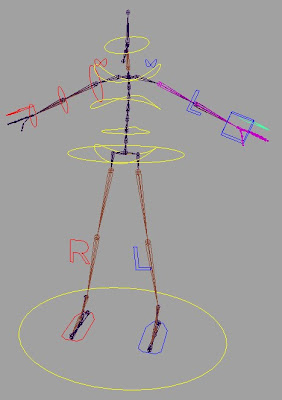
Leg method remained the same. The foot changed quite a lot, and uses a reverse foot lock method I saw at the same time as I learnt the foot roll method of rigs two and up, however this reverse foot lock also combined custom attributes where as the earlier one I had seen whilst I was very much a rigging beginner didnt seem like it added a lot for how complicated it look. Anyway the foot now moves similarly to befor on each aspect (the heel roll, toe roll, and ball roll) all have way for control and also move in several other ways. The spine know uses a few simple controllers, one for the hips, and three for the spine until the shoulders, which have simple orient constraints allowing for a good spine roll, but also have roughly 2 or three joints between each controller, but whereas before I would have put a controller on each joint because I didnt know how to control joints inbetween, this time I used a multiply node to spread the rotation from each controller over several joints. The head and neck used one controller, a simple ik handle from neck to the head and an orient constraint allowing for accurate movement and rotation, but also that the head was still moved by the spine. The arms were an area of big change, out with the seperate forearm joint, as altho in principle it worked well, the low poly game characters mesh suffered from some bad twisting deformation, and problem that could only really be solved by having enough polys to accurately reproduce the flow of the muscles in the forearm. The arm was know controlled using two sets of controls, ik and fk, the ik allowing for quick movements of the arm into position and tweaking with the pole vector at the elbow but the fk allowing for moving of joints one by one down the hierarchy for difficult and more detail armed posing. I also made the controllers much easily to select and differentiate between what does what with colour codes, red for right side, blue for left, and yellow for central.

Sorry for the sheer epicness of this post, if nothing else its for assessment purposes when deadlines roll around and I can actually say yea I learnt a lot.
No comments:
Post a Comment