
Showing posts with label Digital Animation. Show all posts
Showing posts with label Digital Animation. Show all posts
Monday, May 9, 2011
Game Pathway Presentation
Here are the slides from my game presentation, giving an over view of some of the things I've done this year. It reads left to right and top to bottom. Apologies for the size I had to scale it down to fit the image inside blogger file size restrictions

Wednesday, May 4, 2011
Game Animation
I'm going to point this out in MASSIVE CAPITAL LETTERS, I'm not really an animator. This is my diclaimer for anything that the following animations that I've been working on for my game project (everyone is being marked on doing some animation so I had to do some to cross the t's and dot the i's). Anyway thats not to say I don't know to animate I know about using graph editor, key framing and all the principles that we covered in the first year, it just isn't my favourite area (still ranked higher than painting skin weight eguhhhhgh).
We'll start off with something simple, the idea was the turret would stay dormant until the player entered a volume surrounding the turret, then if would start to scan the area, if a player entered a further volume and was in the turrent line of sight it would fire at him, as the player retreated or hid it would scan the area before return back into its "shell".
First attempt at a walk cycle, not too bad but needed polishing. Also I discovered that modeling a character in a traditional t-shape causes some weirdness when you try and bring the characers arms down to its sides.
Walk cycle with a bit more polishing.
Quite stylized run cycle, which I feel matches the slightly cartoony feel of the character. I wanted it to be a bit snappy but not tooo snappy.
We'll start off with something simple, the idea was the turret would stay dormant until the player entered a volume surrounding the turret, then if would start to scan the area, if a player entered a further volume and was in the turrent line of sight it would fire at him, as the player retreated or hid it would scan the area before return back into its "shell".
Untitled from Toby Rutter on Vimeo.
First attempt at a walk cycle, not too bad but needed polishing. Also I discovered that modeling a character in a traditional t-shape causes some weirdness when you try and bring the characers arms down to its sides.
Untitled from Toby Rutter on Vimeo.
Walk cycle with a bit more polishing.
Untitled from Toby Rutter on Vimeo.
Quite stylized run cycle, which I feel matches the slightly cartoony feel of the character. I wanted it to be a bit snappy but not tooo snappy.
Untitled from Toby Rutter on Vimeo.
Thursday, February 24, 2011
Turntable Animation and thoughts on Portfolio
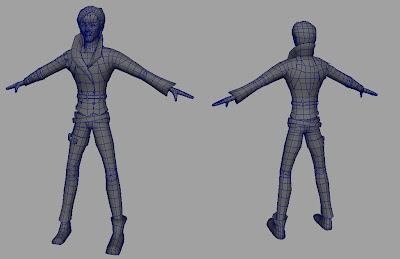
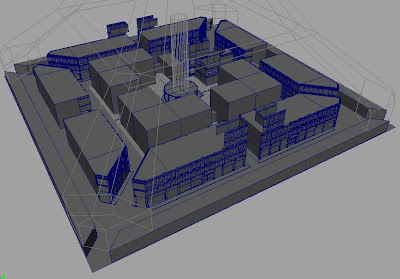
Being at Game On yesterday got me thinking about making sure I have a current portfolio put together, but this is a bit of a problem at the moment with so much of the work I am doing not yet complete and my previous work that is finished not representing where I am currently. I think this is the age old portfolio dilenma and only isn't a problem when the standard of all your work is to such a high level. But it has definately made me want to get the game project worked finished with renewed vigor so it can go into my portfolio. Yesterday I discovered that Maya has a snazy built in turntable function (huzzaah) which helps save a couple of minutes setting up a camera. So I decided to create a wireframe turntable of the Clip mesh from our game, so you can see the model in its entirety. I will be doing this for the five or so characters I will have finished by the end of the game project to start making up my modelling portfolio (they wont be in t-pose like this one I promise, as I will have had to rig them all for the game anyway). The idea of the structure of the modelling portfolio is pretty simple, there will be lots of turntables of the different characters (all posed) showing off the wireframes and the textured versions, and I will also get in some low poly assets that I am particularly proud of and fly throughs of my best environment work. This should produce a good bit of work to show for the time being.
Untitled from Toby Rutter on Vimeo.
Sunday, February 13, 2011
A New Generic Henchman
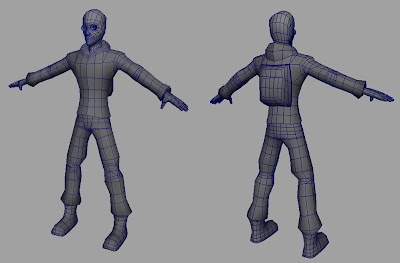
It's been a while since the creation of my first generic henchman for the game, and what kind of evil baddy supreme overlord of evil would have only one kind of generic henchman to throw at passing heroes. The rubbish kind thats who. So anyhow working on similar themes to the first; battered clothing (this is after the apocalypse ya know), more armour as you go up the ranks of generic henchman, and something covering the guys face. There are several reasons for this; firstly faces are hard/ cant be bothered, only joking thats not the case, however faces do pose an interesting problem. If we are using the same types of henchmen over and over again surely the player is a) be happier killing wave upon wave of faceless enemies, as this still makes him feel heroic rather than a mass murderer and b) whilst it does seem vaguely plausible that all these henchman have the same ski mask or gas mask, it would be rather ridiculous for them to all have the same face. Anyway digressing and I want to keep this post short. In conclusion this guys is nearly completion he just needs a bit of poslishing, although not in the face department I really am very pleased with the gas mask, just need to get the rest of the body to that stage, adding deformation geomentry into the elbows etc.


Thursday, February 10, 2011
Henchman Remodel
To the observant among you it may seem like I am just doing the same work over and over again, based on the number of times I have posted pictures of the same character models. I am currently working on the second of our games bad guys/ evil henchman. So hopefully soon there will be a slightly different model for you to look at. Anyway the reason I've gone through doing the third re-model in some cases is to make sure, now that my rig is finished, that my characters can actually move as well as the rig. I have been putting into practise on all my models a series of guidelines for better deformation geometry. I have also been going through and removing lots of unecessary polygons. The polycount for my characters for this game are much more around the ps2 standard. As I am not using normal maps and really high poly sculpting, the low poly meshes dont need to be pushing the 10k tris in order to convey the shapes and forms we want. Anyway thats all for now, I'm going to try and finish my level two environment by next wednesday (along with a list longer than my arm of things that need doing) So hopefully there will be quite a lot of activity on this space (and hopefully stuff that hasnt really been seem before.

Thursday, February 3, 2011
Clip Re-model
This is the third time I have remodelled this character, each time I have learnt something new about the process of character modelling, and will hopefully mean that future characters I create are much better from the start. The key learning points in this re-model have been creating geometry that actually deforms well when animated. This meant a lot of simple things really, making sure to have at least three edge loops on any joint which deformed, in the most case this was true for the old model, with the exception of areas such as the top of leg. The big improvements was mainly lowering the number of unnecessary polygons, the character is now as low as 5000 tris from just over 9000. At the moment he is looking more like a hi end ps2 character which I am happy with at this stage, I dont have the time in this project to be creating next gen level character models, sadly. Another big improvement was the accessories and how they sit on the model, I found some good advice that said accesories should either sit on top of verticies or match the edge flow of the body beneath. This way when skinned they wont intersect the model and maintain their position. I also spent some time time re-modelling the head, with much better edge flow the only issue is I am now not satisfied with how the head looks visually (which is annoying) but for now I dont have time to spend more time remodelling it again.

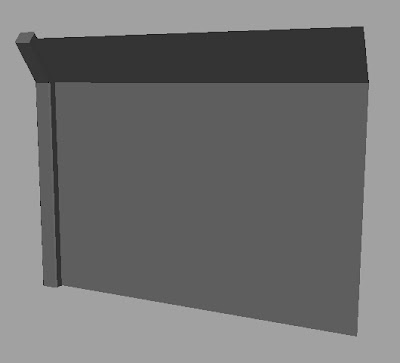
Level One Environment Work
This is an idea I had for a signal box that would feature in our abandoned train yard, which is the key area of level one. I saw an image of a signal box built above the train track and thought this was an interesting premise for creating an asset.


City Enviroment Work
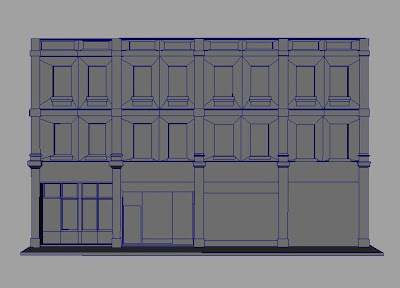
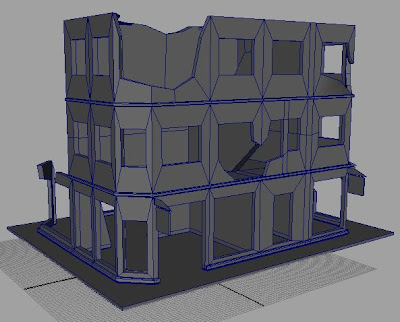
If you have seen some of my recent posts you may have noticed I am now modelling the entire of our city level, which wasnt originally my plan, but it's been a fun challenge and architectural and environment modelling is definately one of my weak points, so it's definately worth practising. It occured to be that I have posted up big shots of the entire city at the moment but hadnt posted any of the individual buildings I built when I was just working on bits of level two. The ruined corner building was my first architectural endevour, I am currently getting all of the city up to a similar level and then going in and adding localised detail. The second building started from a reference image, the idea being that not all of the city would be free for the player to roam inside, for the sake of our sanity.


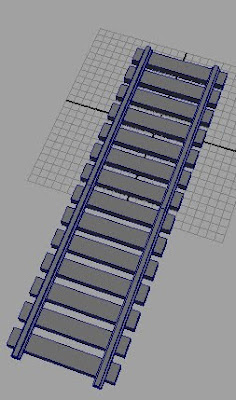
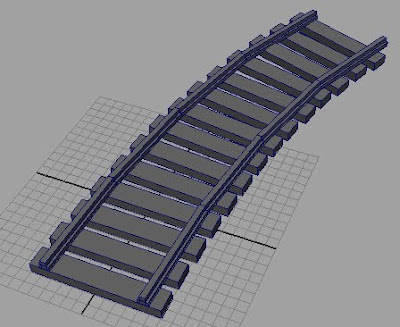
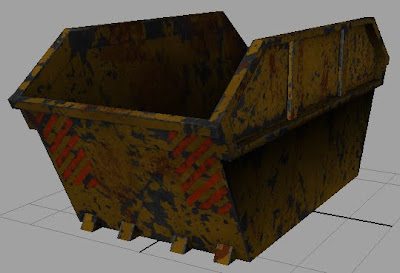
Low Poly Assets
These are another series of low poly assets that I have modelled in between other bits I have been doing. All of it is nice simple stuff with a low triangle count that can be reproduced multiple times with perhaps the exception of the train track sections which contains quite a lot of polys when its duplicated many times. The fence may seem like very little, but the beauty of it is that the texture does most of the work. For instance the plane section will just have transparancy and a painted image that looks like a barbed wire fence, this way the player cant get through the plane (as it will have a collider set to it) but will be able to see through it, without using a lot of polygons making each piece of wire in the fence


A few bits of texturing
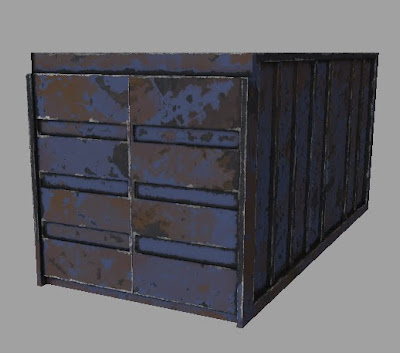
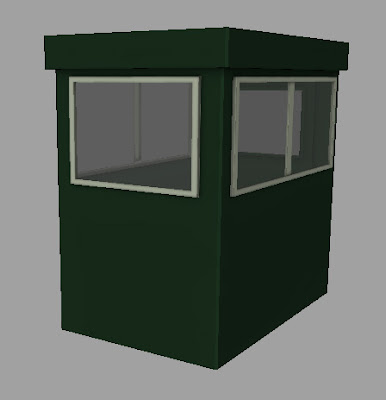
A lot of the blog posts going up today are long overdue, I've been struggling to keep the blog updated in between working on projects. Anyway here are a few low poly assets and a little scene that I made for the game, the cargo container was the first thing I textured and has been used as an experimental process to learn how to texture better and what style of texture looks good for the game. Made issue with it is that it is still very early in the texturing process, there is plenty more I want to do to it once I can go into texturing in more depth, but at the moment I have lots of things such as entire levels that need to be built first. The little scene is an enlargement of the security booth asset I made, which I have just dropped some colour on and started to age.


Monday, January 24, 2011
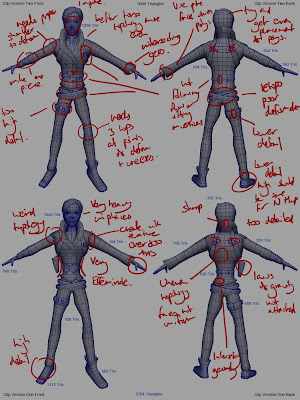
Character Modelling Critique and Re-Model
With my Game Character Rig pretty much complete, I am still playing around with a few bits and bobs like parenting weapons to hands etc but thankfully this work can continue after the character is skinned to the rig, I have started to look critically at the main protagonist model, and soon I shall direct my attention to my low level enemy. The reason for this sudden critique is that for the last however many weeks the various rigs I have been building have been the limiting factor to how well the character would animate, ie the foot can't be moved that way etc. Well now that the rig is pretty much complete and is I think a very good rig, I realise that the character model isn't as fantastic as perhaps I thought it was when I first built it. After the first rebuild of the character there wasn't much wrong with the shape of the character as I had been working very closely with the concept art I was given, however the big issues with the character come with topology, which was much better in the second version than the first however it still leaves something to be desired. There is also the problem of where polygons are currently allocated, having done a bit of research during this model crit I discovered one of my feet has over 1000 polygons, now the converse shoes does look very nice but for how much its going to be seen in a 3rd person game and the size of the detail this is completely unnecessary so thats going to change. This is a big thing across the entire model I've noticed there is a lot of small detail with high poly counts, not surprising as details require more polygons to create, however I really should have spent more time considering the on screen size of these details and how many polygons comparitively I was spending in these areas. This critique has highlighted when you texture a model and turn off the wire frame you could have two identical models next two each other and you wouldnt realise that one has a really good topology for animation and no wasted polys where as the other has a very uneven polygon placement and would deform terribly. My task at the moment is to make my main character model the former.

Friday, January 21, 2011
Texturing
I've been practising my texture painting recently on assets for the game project. I learnt a lot about texturing while creating my witchdoctor piece and also my steam robot character (which I mainly did everything wrong and thus learnt lots of valuable lessons). The big differnce in my current texturing work and my early work is that I am really relying a lot less on photos, although I still use them sometimes for colour reference (using the colour dropper to pull rust colours out of a photo for instance), but other than that I try to completely hand paint my textures. There are several reasons for this, first eventually you are going to want to create something that it will be hard or impossible to find photo reference or even go out a take your own photos, and secondly although hand painting a texture may seem like a lot of work using photos as textures still requires a fair bit of playing around to make the photo useable. For instance you are always going to have trouble, especially on metal surfaces making a photo of metal look diffuse (as you want no strong shadows or highlights in your colour map, this is all handled by specular and other maps), and chances are you are going to have to spend some time removing discerning features from the photo so that if the texture is tiled or used multiple times people dont notice features that identify it as the same texture. Photoshop really has so many good features that you can create amazing textures (I'm not saying mine are but I have seen incredible work that I'm aspiring to), I have now cracked making metal textures appear a lot more realistic using nothing more than grunge brushes and layer masks. But anyway enough waffle, at the moment I'm pretty pleased with how the texture is coming a long, I'm working on building in rust at the moment, this is coming along much better since I found a really good set of rust brushes, now its just a case of playing around to get the best results. Its always great to preview a texture on a mesh as it's amazing how good you can make a simple box look with the addition of texture.

Thursday, January 20, 2011
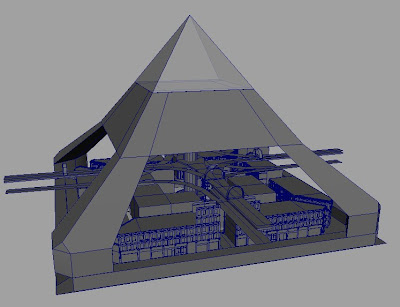
Environment Modelling
Here is someone environment modelling I've been doing for our game project. We had a few visual ideas that the programmers wanted included and that as a group we decided would make impressive visual set pieces. The pyramid construct was key to what the programmers wanted from the second level of the game, in my original concept art it was going to be on group level surrounded by the city buildings, however a key features that the group wanted included as part of the theme for all of the environments was the highways/train tracks running above the area, meaning we had to think of a different way of working in the pyramid structure. Some of the things I looked at as reference was the streets of Paris and other european cities such as Budapest for architectural reference, the are also areas of birmingham that influenced the way I modelled the buildings and streets to match up with the ground plan concept I was given. I also liked the idea of a second rail system above the streets much in the style of chicago's EL. At the moment the city is in somewhat of a blocking stage, although it has quite a lot of detail considering. This is due to roughly a quarter of it being built for the demo and the rest just being blocked in. I am now going through removing unnecessary details such as insides of buildings, combining pieces together and generally cleaning up before I start working in proper details and set pieces


Saturday, January 15, 2011
A Brief History of Rigging
Hello again, second blog post of the day so I'm feeling pretty good as I don't feel like I'm neglecting the blog as much as I usually do. Anyway this is the blog post on the history of my character rigs, and what I learnt making each one, that I mentioned I would be posting. This does mean the the rig I've been working on since wednesday evening is now finished, next step skin it up to the character and see if it really works. So without further a do, in chronological order the four rigs I have make thus far for the game project. I apologize in advance for the fact that the pictures arent terribly exciting theres only so many ways the layout of the joints are going to change, but at least the controllers become more colourful/interesting in shape towards the end. Spine was controlled with an ik spline, a feature that remained all the way up until rig version four, this differs from an ik handle. The spline created a nurbs curve, the cv's of which could be moved to change the shape of the back, so I attached deformers to the cv's and then controllers to the deformers. However the issue that I eventually realised was the problem with this method was that you end of using translate to change the shape of the spine instead of it rotating cause a realistic roll, which I attempted to recreate in the final rig version.
Rig Version 1
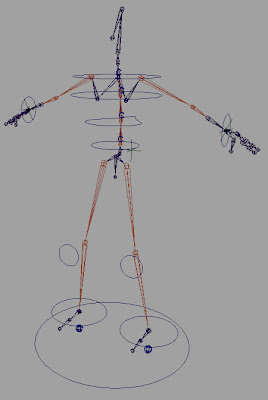
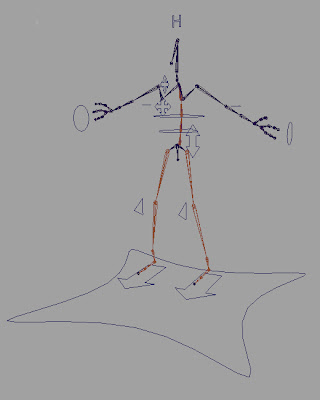
This was very much my first forray into rigging, well properly anyway during introduction to digital I did experiment with joints and ik handles trying to make a robots arm strum a guitar. The main features of this rig was an ik handle with pole vector to control the legs, with the pole vector controlling the knee. This I did right and will remain in all of the future rigs that I am talking about. Legs are definately something you want to move with iks, you just grab the controller at the ankle and move it and the knee moves in response, then the pole vectors there if the character needs a little tweak. Feet however used a method that was incredibly basic and didnt make it any further than rig version one, however it did start to teach me set driven key and how to put limits on controllers which were useful lessons to learn. The way this little controller underneath the foot worked was that you would move the foot forward or backward to change the rotation of the foot between two point (30 and -30 degrees I think). This was simple but worked, however it was clear from animator feedback that they wanted a realistic looking footroll so I set out to find out how to do that. The head and neck had absolutely no ways of being controlled in this rig, a major downside to it, the was later rectified, unsuccessfully several times. Finally the arms, these used an ik handle again, similar to the legs. This method stayed in a few versions of the rig, and half stayed in the final one. In order to try and create a realistic rotation of the wrist from the forearm, created a joint between the elbow and wrist, in order to get the ik to still work from the shoulder to wrist this required a bit of playing around but I got it there. The fingers also had no method of being controlled in this rig other than by manually selecting the joints, I also only had two fingers and a thumb, the theory being that one rig finger could control to real fingers. One of the main flaws of this rig and also several future rigs was that I didnt yet understand joint orientation and that translating individual joints to put them in place caused a serious offsetting of the joints orientation, sometimes causing the rig to move and behave in rather unusual ways.
Rig Version Two
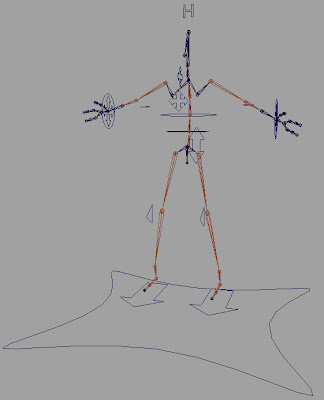
Method of controlling the leg remained the same and successful as ever, win. First major change, footroll, as per animator request I managed to incorporate a foot roll using more set driven key, which I was slowly getting the hang of along with the connection editor. The idea being that the foot controller moving the leg ik also had a custom attribute that controlled foot roll, by scrubbing between different values the foot went from default position to heel angled back, to the ball of the foot on the ground with heel raised, to the bare tip toes on the ground and the rest of the foot in the air. This for a while worked well. Spine rigging method remained the same, I also created a controller that the root joint was parented to which allowed for the character to be moved up and down and also get some hip movement. arms remained fairly similar, they were slightly better oriented in this rig cause for a better movement, however I did a a seperate controller for rotation which cluttered things up quite a bit and made somethings more complicated. Other controller changed include the controllers for the upper body to be different shapes so they could be more easily selected. Finally I include a head controller, and it was a monumental failure. It managed to seperate the head from the hierarchy of the spine meaning when you bent the spine forward the head stayed in the original position forcing you to reposition it by hand making it hard to be accurate and create realistic head movement (we had a lot of rather large head bobbing going on).
Rig Version Three
This rig update is a bit shorted as it was never completely finished. I remade a lot of it using the existing working (ish) methods, so same leg and foot set up, although I did want to find a way of creating better control in the foot. The spine and the arm set up remained the same, the big change however was that a) I added the correct number of fingers, and b) I actually found how to control them. So add to the rig a controller over the back of the hand with custom attributes using the connection editor and set driven key to control each fingers individual curling and spreading attributes. After trying many different ways including: constraining. a controller to each joint in the finger (incidently the same method I tried with the head, no surprises it failed), attempting to using ik handles, ik splines, and probably more crazy things out of sheer desperation, it was a huge relief to finally crack how to animate fingers. I was also going to try and resolve the head issues in this rig but it was towards the end of this rig when I found some very good tutorials by Dennis Jenson that suggested some far better methods for stuff I had previously done. So instead of messing around with the head some more then skinning the rig only to discover it didnt work as well was the next one would I thought I would just move straigh on and save myself some time.
Rig Version Four
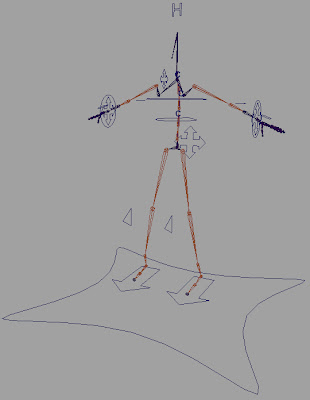
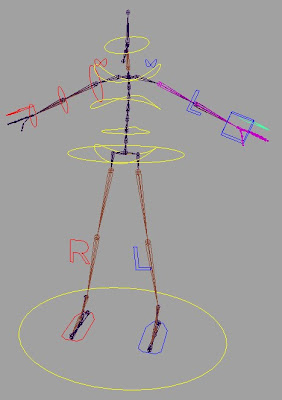
Leg method remained the same. The foot changed quite a lot, and uses a reverse foot lock method I saw at the same time as I learnt the foot roll method of rigs two and up, however this reverse foot lock also combined custom attributes where as the earlier one I had seen whilst I was very much a rigging beginner didnt seem like it added a lot for how complicated it look. Anyway the foot now moves similarly to befor on each aspect (the heel roll, toe roll, and ball roll) all have way for control and also move in several other ways. The spine know uses a few simple controllers, one for the hips, and three for the spine until the shoulders, which have simple orient constraints allowing for a good spine roll, but also have roughly 2 or three joints between each controller, but whereas before I would have put a controller on each joint because I didnt know how to control joints inbetween, this time I used a multiply node to spread the rotation from each controller over several joints. The head and neck used one controller, a simple ik handle from neck to the head and an orient constraint allowing for accurate movement and rotation, but also that the head was still moved by the spine. The arms were an area of big change, out with the seperate forearm joint, as altho in principle it worked well, the low poly game characters mesh suffered from some bad twisting deformation, and problem that could only really be solved by having enough polys to accurately reproduce the flow of the muscles in the forearm. The arm was know controlled using two sets of controls, ik and fk, the ik allowing for quick movements of the arm into position and tweaking with the pole vector at the elbow but the fk allowing for moving of joints one by one down the hierarchy for difficult and more detail armed posing. I also made the controllers much easily to select and differentiate between what does what with colour codes, red for right side, blue for left, and yellow for central.
Sorry for the sheer epicness of this post, if nothing else its for assessment purposes when deadlines roll around and I can actually say yea I learnt a lot.
Rig Version 1
This was very much my first forray into rigging, well properly anyway during introduction to digital I did experiment with joints and ik handles trying to make a robots arm strum a guitar. The main features of this rig was an ik handle with pole vector to control the legs, with the pole vector controlling the knee. This I did right and will remain in all of the future rigs that I am talking about. Legs are definately something you want to move with iks, you just grab the controller at the ankle and move it and the knee moves in response, then the pole vectors there if the character needs a little tweak. Feet however used a method that was incredibly basic and didnt make it any further than rig version one, however it did start to teach me set driven key and how to put limits on controllers which were useful lessons to learn. The way this little controller underneath the foot worked was that you would move the foot forward or backward to change the rotation of the foot between two point (30 and -30 degrees I think). This was simple but worked, however it was clear from animator feedback that they wanted a realistic looking footroll so I set out to find out how to do that. The head and neck had absolutely no ways of being controlled in this rig, a major downside to it, the was later rectified, unsuccessfully several times. Finally the arms, these used an ik handle again, similar to the legs. This method stayed in a few versions of the rig, and half stayed in the final one. In order to try and create a realistic rotation of the wrist from the forearm, created a joint between the elbow and wrist, in order to get the ik to still work from the shoulder to wrist this required a bit of playing around but I got it there. The fingers also had no method of being controlled in this rig other than by manually selecting the joints, I also only had two fingers and a thumb, the theory being that one rig finger could control to real fingers. One of the main flaws of this rig and also several future rigs was that I didnt yet understand joint orientation and that translating individual joints to put them in place caused a serious offsetting of the joints orientation, sometimes causing the rig to move and behave in rather unusual ways.

Rig Version Two
Method of controlling the leg remained the same and successful as ever, win. First major change, footroll, as per animator request I managed to incorporate a foot roll using more set driven key, which I was slowly getting the hang of along with the connection editor. The idea being that the foot controller moving the leg ik also had a custom attribute that controlled foot roll, by scrubbing between different values the foot went from default position to heel angled back, to the ball of the foot on the ground with heel raised, to the bare tip toes on the ground and the rest of the foot in the air. This for a while worked well. Spine rigging method remained the same, I also created a controller that the root joint was parented to which allowed for the character to be moved up and down and also get some hip movement. arms remained fairly similar, they were slightly better oriented in this rig cause for a better movement, however I did a a seperate controller for rotation which cluttered things up quite a bit and made somethings more complicated. Other controller changed include the controllers for the upper body to be different shapes so they could be more easily selected. Finally I include a head controller, and it was a monumental failure. It managed to seperate the head from the hierarchy of the spine meaning when you bent the spine forward the head stayed in the original position forcing you to reposition it by hand making it hard to be accurate and create realistic head movement (we had a lot of rather large head bobbing going on).

Rig Version Three
This rig update is a bit shorted as it was never completely finished. I remade a lot of it using the existing working (ish) methods, so same leg and foot set up, although I did want to find a way of creating better control in the foot. The spine and the arm set up remained the same, the big change however was that a) I added the correct number of fingers, and b) I actually found how to control them. So add to the rig a controller over the back of the hand with custom attributes using the connection editor and set driven key to control each fingers individual curling and spreading attributes. After trying many different ways including: constraining. a controller to each joint in the finger (incidently the same method I tried with the head, no surprises it failed), attempting to using ik handles, ik splines, and probably more crazy things out of sheer desperation, it was a huge relief to finally crack how to animate fingers. I was also going to try and resolve the head issues in this rig but it was towards the end of this rig when I found some very good tutorials by Dennis Jenson that suggested some far better methods for stuff I had previously done. So instead of messing around with the head some more then skinning the rig only to discover it didnt work as well was the next one would I thought I would just move straigh on and save myself some time.

Rig Version Four
Leg method remained the same. The foot changed quite a lot, and uses a reverse foot lock method I saw at the same time as I learnt the foot roll method of rigs two and up, however this reverse foot lock also combined custom attributes where as the earlier one I had seen whilst I was very much a rigging beginner didnt seem like it added a lot for how complicated it look. Anyway the foot now moves similarly to befor on each aspect (the heel roll, toe roll, and ball roll) all have way for control and also move in several other ways. The spine know uses a few simple controllers, one for the hips, and three for the spine until the shoulders, which have simple orient constraints allowing for a good spine roll, but also have roughly 2 or three joints between each controller, but whereas before I would have put a controller on each joint because I didnt know how to control joints inbetween, this time I used a multiply node to spread the rotation from each controller over several joints. The head and neck used one controller, a simple ik handle from neck to the head and an orient constraint allowing for accurate movement and rotation, but also that the head was still moved by the spine. The arms were an area of big change, out with the seperate forearm joint, as altho in principle it worked well, the low poly game characters mesh suffered from some bad twisting deformation, and problem that could only really be solved by having enough polys to accurately reproduce the flow of the muscles in the forearm. The arm was know controlled using two sets of controls, ik and fk, the ik allowing for quick movements of the arm into position and tweaking with the pole vector at the elbow but the fk allowing for moving of joints one by one down the hierarchy for difficult and more detail armed posing. I also made the controllers much easily to select and differentiate between what does what with colour codes, red for right side, blue for left, and yellow for central.

Sorry for the sheer epicness of this post, if nothing else its for assessment purposes when deadlines roll around and I can actually say yea I learnt a lot.
Non linear Animation Test
I was hoping to have finished final rig (for now at least) and subsequently right a post on the different rigging I've been working with, however the rig is in a nearly there state of a completion I'm just ironing out problems and building the right arm. However I wanted to test out a method of animation that I had planned for us to use on the game project to create nice easily to access character animation sheets. The theory being that all the animations for each character would be created and put into one easy to access maya file or converted into fbx for a straight import to the game engine. Seemingly the best way to do this would be to use something called the trax editor in maya, and a combination of character sets, poses/animation and trax. Essentially what this process required was for us to select the characters rig and whatever the key frames where being assigned to, in our case a series of nurbs curve based controllers. Then we make a character set for that character, for instance "clip" our main protagonist. Then we animate the piece of animation we want to do next. Animation for games is a bit strange as all the animations are created seperately, but need to make sure they will seemlessly integrate with one another, for instance you will create a walk cycle, a jump on the spot and a jump while the character is moving (everyone whos played games knows you can jump a ridiculously longer distance if you were moving to begin with). But I have gone off point, this means that in a lot of ways it makes sense to make different maya files but the programmers want one file with all the different animations for each character, a problem to overcome. And it turned out to be simple, the trax editor in maya, by saving out pieces of animation for each character set as a clip (a special animation file, it gets confusing explaining whilst talking about a main character also called clip) you can then import all the clips into one scene, and move the animations around. re-order, scale etc the animation as an entire clip rather than its individual keyframe, its like editing lots of clips of video together, this scene can then be saved for the prgrammers to open in the engine and code that when the player presses forward the character will move and the animations between frames 1 and 24 of the walk cycle will be cyled, magic. This video is of a walk cycle made for clip the main character, which I created a character set for, saved the walk animation as a clip and then experimented with duplicating to increase duration, and scaling the length of the clip to slow and speed up the walk.
Untitled from Toby Rutter on Vimeo.
Thursday, January 13, 2011
Rigging
This is the start of my new iniative called stop working for five minutes to actually post updates of the work on my blog, as it has been some what neglected recently. As the title suggests this short post is going to be about the joys of rigging. They way I am writing this may seem laced with sarcasm suggesting that rigging is in fact not a joy to do, anyone who interprets it this way your about half right. I've had a bit of a love hate relationship with said rigging. But as far as I can tell rigging is all about problem solving and that in a lot of ways has been fun, there have been plenty of tearing my hair out moments (the aforemention hate part of the relationship) but it is cool facilitating animators with the ability to make the creations you've built dance around. I am pretty sure that the 3D art and modelling side of the cg pipeline is for me, however I do feel that knowing how to pose a character in maya by implementing a decent rig is a good thing, in fact anything that gets rid of boring t-pose characters is a good thing, for instance transpose in zbrush. But anyway I have digressed a fair bit. Key points, rigging more fun than I thought, I am no rigging/mel scripting genius my rigs have been a combination of tutorials for rigging different body bits that have then been frankensteined together to form a rig, which has resulted in mixed success. That said I think I am at the stage now, on rig version 4 that is should meet all the requirements for this project so I can stop rigging for a bit and go back to the stuff I really enjoy. I am currently rigging the arms and the picture below shows my ik/fk switch arm I am creating, I really like this screen shot because it demonstrates the most complicated and "what the hell is going on there" (thats the expression non riggers have) piece of rigging I can do. My next post in theory will be a quick recap of all the rigs I've built, all four of them, and a bit of analysis, what was good/bad/hilariously bad (you really should see some of the things that rig version 2 did to our skinned characters head and neck, I may make a blooper real style vid documenting it). Anyway thanks for reading if you read this, apologies for use of made up words and stuff spelt inside out etc, this is the general disclaimer that comes with most of my written work.


Saturday, December 11, 2010
Cargo Containers
I started modelling a shipping/cargo container a little while ago to be used as a game asset. All was going well but I hit one major problem. In creating all the extrusions to give the container the nice textured feel, the polycount was getting very high (roughly 3000 triangles) this was a bit (understatement) much. So now that I am back in full game mode, I decided to have a play around again and came up with a slightly ingenius way of lowering the polycount, and have now managed to get it down as low as 509. Without losing any detail or creating strange n-gons. This is a much more managable number. As all ground level crates or crates the player will be near/ come into contact with can be these 500 poly ones and any that are inaccessable can be a simple cube the same size with the same texture applied (this works very well at a distance). Thus allowing us to stack up loads of crates if we feel it will create a nice aesthetic without racking up insance poly counts. This is the aim with all the assets I am creating. To try and work out how much the player will come into contact and how much I can cheat.

Redonkulously high poly image (actually has LESS detail than the top image)


Redonkulously high poly image (actually has LESS detail than the top image)

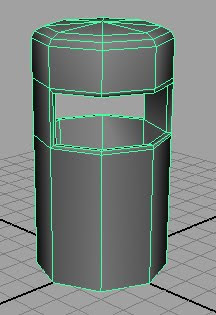
Basic Texturing
What with assessment now over my attention is once again completely concentrated on the digital animation project. In theoy there will be lots of posts next week, as we are going to do a huge lets get stuff done session and be at uni every day. As you may have seen I've been beginning to UV map and texture characters, by way of previewing what they will look like. And I am slowly working in details to those character textures. I have also started contributing more assets to the game, now that my rig is finished (which the exception of those pesky fingers). Here is one of the assets I built (its very low poly under 500) and is a security booth that will soon have a barrier to accompany it. I have this morning UV mapped it and painted a basic flat colour to it. Then mapped the AO over the top. The next step is for me to paint in the material properties (ie make it look like its been made of some sheet metal and plastic for the window frames). And then the fun can really start, by this I mean the texture distressing making this booth look like its been scratched, burnt out and generally wrecked.

Monday, December 6, 2010
Texturing Preview
Here is one area of my progress with my game work (there has also been rigging progress and other such progress which looks less snazy as a screenshot, so that will remain as it often does hidden underneath the character meshes maintaining the illusion that they move by magic). This is the very very (did i mention very) basic blocking in of the colours so I can quickly tell which area of the mesh is which and the base colour that is going to be. The astute among you will notice that the henchmans mesh has lots of black on it, this is down to the ambient occlusion map that I have baked as a texture (baking it allows me to use it in game) this shows me areas of shadow, for example the dark lines on the torso showing me that no light reaches this area as its covered in bag strap. I like getting these basic blocks in (as it means texturing has officially started and it starts to give you a preview of the character) I will over the next few days/weeks be adding lots of detail, texture, distressing etc to these texture maps, creating a bump and spec map for each (as well as the AO map that clip is missing) and if we get lucky with time I may eventually normal map the characters for that extra bit of detail.


Friday, December 3, 2010
Character Update
I thought it was time for another blog update, I'm actually finding it hard to find the time to stop working to document all the work I am doing. It's assessment week for narrative next week so thats all a bit hectic, but we are also nearing day by day the january deadline for the game demo, and what with christmas hols just round the corner I am keen to motivate my group that anything done before christmas doesn't have to be done over christmas. That said everything is starting to fall into place a bit more. So here is a little bit of what I was working today. We have an image of Clip our protagonist, and I know the model looks very similar to the last models I have posted of him, but there have been some subtle differences. With the exception of his previously rather ladylike lower body and waist done of the actual shapes have change. For instance you probably wouldnt notice from looking at it that I completely remodelled the face today, to a lower polygon topology and a much cleaner one. I have also remodelled the torso jacket from scratch to again change the topology to a better one for deformation. I also went through and managed to reduce the overall polygon count by about 2000, although some of this has been re-invested. The reason for this is one wednesday I got the game group to test my rig (version one) out and test the semi skinned character. We managed to find plenty of areas with room for improvement both in mesh and rig. And hopefully now some of these have been rectified with the Clip remodel and the WIP of rig version two complete with much better feel, hands, controllers and more. Anyway I have waffled enough.


Subscribe to:
Posts (Atom)