
Showing posts with label CGI. Show all posts
Showing posts with label CGI. Show all posts
Sunday, January 2, 2011
Its been a while
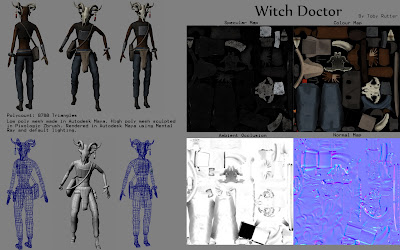
As the title suggests it has been a while since I posted anything on my blog. So merry Christmas and a happy New Year. I am going to use this post to showcase a piece of work I have been doing in my spare time (when not running round like a headless chicken doing uni work and learning things to *fingers crossed* improve uni work), the piece of work was created working to a brief, which required me to create and texture a game character/ vehicle/ or environment. Bearing in mind the restrictions of creating assets for games. I chose to create a game character, and if you've seen any of my previous blog posts you will probably have seen him coming along rather nicely. Recently this project had been forced into the background as my game work for uni has somewhat taken prioty, however with the deadline near the start of january, I decided that even if I did very little else over christmas, I would finish this, and I would finish it well. I am very pleased with the finished result, considering I began using Maya this time last year, and my 3D software experience prior to that was very slim, I feel I have made good progress in a year and hope I can make a similar leap forward by this time next year. However that said there is (as with all finished pieces) plenty I have learnt whilst doing it, and a lot I would approach in a different way next time around. Any feedback will be greatly appreciated, if not for this piece (as the deadline is fast approaching) but for future works that can be improved.

Wednesday, December 22, 2010
Witchdoctor Update
It's time for a quick update of how my little witchdoctor side project is going (I think quite well, but I'll let you judge). This is my first attempt at using zbrush on a character I have designed and also my first attempt at using normal maps (already since starting this I have decided on a different work flow I will be using in the futute for the creation of my real time characters). I havent spent as much time on this guy recently as the game work I've been doing for uni has somewhat taken over my life. The images below are split into 3 categories high poly zbrush sculpt of the character (no where near as high poly as I could go), low poly character models in Maya with the normal map of the high poly applied, and finally a preview of the colour map, which at his stage is just block colour, ambient occlusion mapped from the high poly details, and the start of a denim pattern that will be used on his jeans and canvas bag. Enjoy.


Saturday, October 9, 2010
Character Update
The creation of this character is turning into somewhat of an epic saga, last night the character was nearing completetion (with colour map pretty much there, and a test of the first bump map working well), but then this morning came the twist in this tale. Upon attempting to test some more changes I had made to the colour map (I am now in the process of neatening bits and bobs up and removing any remaining seams) I was confronted by the rather startling error message "Fatal Error" followed by maya promtly crashing, and refusing to open the document. Now here is the moral of the story always use incremental saves! ALWAYS! This annoyed me as normally I do and I only had myself to blame, and I was a fool to think what can possibly go wrong I'm only applying a few textures, how young, and foolish I was. Anyone long story short turns out it was something weird to do with the texture that was screwing up maya, so I managed to import the geometry from the maya file, and deleted the material and now I'm back to where I was last night, a little bit further back but a lot wiser. But anyway I have digressed quite a bit from the point of this post, which was to post up a few images of the character with the nearly finished colour map applied, a screenshot of the colour map and any other random bits an bobs. So enjoy.


Tuesday, October 5, 2010
Character Test
Ok so in hindsight that problem was actually quite easy to solve, o well you live an learn. But this has just made me jump up and down (and possibly scream in a manner I'm not proud of). Here is a test of my first character with first colour map (please be not tooo scathing in the judgements it isnt finished yet) and once I've made some bump maps, specular maps, added some more details (scratches and dirt) and cleaned up the blindingly obvious problems of one or two (or more) texture seems. He will be finished and reading for scathing judgement (mainly off me). But this feels like a huge step for me, I've never managed to succcessful uv map anything this complicated (and it feels great to have achieved that) I have also never painted my own textures to this level. And this has given me a further realisation, I think I always knew that I really enjoyed the modelling aspect of maya, I can entertain myself for hours tweaking verts. But seeing a model even only as a test come to life when the textures are applied makes my day. I'm definately thinking games artist's jobs are looking like the job for me.


Hmmmm.....thats not right
This evening is a special occasion I have just applied a test of my colour map. But sadly I appear to have hit a bit of a problem, for some reason (I have know idea) the map is appearing... well like this (see below). This isnt the first time this has happened, everytime I have tried to apply something I have painted to a mesh (no matter how simple) this has occured, and its really bugging me, so on the off chance anyone knows how to solve or, and so you can have a little ganderat how spectacularly this has gone, I thought I would post i up, enjoy.


Monday, October 4, 2010
Colour Map
Ok so here is an update on how the texturing is going. So far so good, I think its all going well although I won't really know until I apply the map to the mesh and have a look, but you learn from your mistakes so I'm not too worried. This has taken a little longer to post up, I didn't do as much over the weekend as I wanted (thanks very much team fortress 2) but I've made a lot of progress today and have finished blocking in all the metal panels and have nearly (over 2/3 the way there) started to do basic distressing on each panel. After this you can look forward to me going on and on and on about painting rivets, adding scratches where I dont think the model is scratched enough and generally dirtying him up. I am pleased with the look at the moment I was going for a really cobbled together feel and I think thats coming across. Once I finish the colour map I am going to create a bump map from it (to give the different layers of panels a sense of depth) and also a specular map (pretty important as hes made out of metal). There are also a couple of other maps I might try, I would like to do normal map/depth map, but I can see myself opening this mesh in zbrush so I might just make one using crazy bump from certain bits of the metal textures that I feel might need some extra detail. Anyway rant over, enjoy.


Friday, October 1, 2010
UV Map
Finally after what feels like hours and hours of work (well it was hours and hours but it feels longer) I have managed to complete my first successful attempt at UV mapping a character (and one I built from scratch no less). I've learnt a few things along the way, do whatever you can to make this process quicker/ more accurate. I think the next step will be to purchase UV layout ( a very good program which should help reduce the raw time required). But that said it hasn't been too bad using just the tools built into maya, I've been mainly using the unfold, and relax tools to spread the uvs, along with the uv smudge tool to move groups quite quickly and some one uv at a time adjustments. Theres also been a lot of cutting a sewing uvs in order to reposition seams, something I only really got the hang of towards the end so if I restarted again uv mapping from stratch I would probably get better results, but thats just down to the experience I've gained whilst doing it. Also something I've learnt has prompted a little internal debate as to what is the best way to start getting uvs for certain pieces. Now most things its pretty obvious and you can use the planar, cylindrical or spherical maps. But it the automatic map I have an issue with. You can specify how many angles it maps from but I find that it breaks parts down far too much forcing you to spend even more time piecing bits back together in order to have a managable number of pieces when it comes to painting the textures. This is a tool that if I do spend some more time using maya tools I will experiment with in order to better understand it. I might go back and have another wack at uv mapping my mech once I get through the texturing stage on this mesh, as I would love to see him textured.


Thursday, September 30, 2010
UV Mapping
Yesterday I began the long process of UV mapping my character. I haven't previously managed to UV map my own creations with any great success, and so far its not going badly. I am UV mapping using the tools built into maya, although in the near futute I think I'm going to download UV layout to make my life easier and save a lot of time. But I did feel before I take the easy route I should do a couple of models the hard way. For the most part the UVs are looking too bad on this model. There are a few bits of stretching here and there (thankfully I've managed to keep most of it in the areas that you can hide it) and there are also a lot of seams due to the most common shape being cylindrical but these can be covered up during the texturing process with the clone stamp tool and so it shouldn't be a problem. At the end of the day I'm happy I've got this far and am looking for to texturing on of my own creations more than anything else, once I get to that stage I can look map at the workflow and the creation of the uv maps and be really critical about what should have been done better and how it could be improved.


Wednesday, September 29, 2010
Kettle Composite Finished
Here is my finished composition, I rendered out all the layers and assembled them in photoshop, tweaking opacity on some of the layers, masking out some problems I had with the reflections and also creating a depth of field effect by apply a blur to the edges of the kettle driven by an alpha made from the depth map layer.


Tuesday, September 28, 2010
Compositing
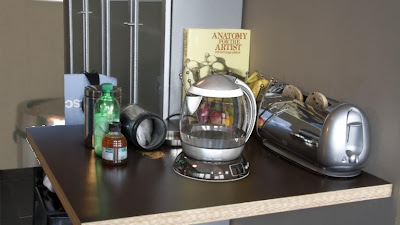
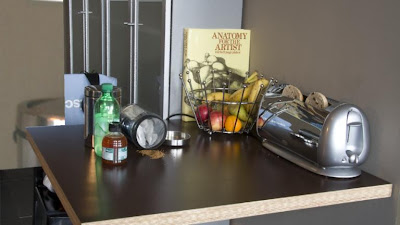
Im just working through the last few escape studios tutorials from their Maya Core course. At the moment I am working through a brief introdution to compositing tutorial (its only a brief introduction as compositing is a huge discipline within CGI and they have whole courses dedicated to it by itself). So I am currently trying to composite the nurbs kettle I made not long ago into a photo using a few compositing tricks. The images below are (in order): the composite as it stands at the moment, the background image, the occlusion layer creating subtle shadows between some pieces of geometry that have been textured using a technique called camera mapping to map the background image from the camera taking the renders too the geometry. I also have a depth map layer creating depth of field on my kettle (although not present in these renders) and a shadows layer (but I left this one out as its currently jet black shadows which are rather obvious, they will be toned down in the compositing package)


Monday, September 27, 2010
Steam-Bot
Im looking forward to being able to scream such phrases as "IT'S ALIVE" etc as todays creation is nearing completion. At the moment I am just going into the mesh and tweaking, flicking between the smooth and un-smoothed geometry making small changes and adding little bits of detail (which seems to consist of extruding random faces and defining them with edge loops) I want the mesh to look as if he was sort of cobbled together out of different bits of metal. This will be easier to demonstrate if and when I texture him (I really should) as bump and normal maps will allow me to add smaller details such as rivets and texture to bits of metal that will give him a more patchwork feel. I hope the pipes are coming out ok I have been trying to link up body parts to demonstrate the steam being pumped through his body to allow him to move. One area I feel needs a bit more work is the head, as its looking a bit too smooth so I think Im going to rough it up a bit and make it look for robot-y


Attempt at Character Creation
I decided it was about time that I actually built an original character design, something I've found a bit hard because I keep over doing it a bit and trying to fly before I can crawl. So this morning I began modelling this character based on some very simple reference images I drew months ago. The idea behind it is its a steam powered robot, for a medievel fantasy setting. So think robotic suit of armour, only this character is a bit weedy. I am quite pleased with how its coming along, still need to tackle the arms, lower leg and head. I'm currently finishing the knees and the shoulders and I have already built the hands in a seperate scene. Then its just going to be a case of going in and modelling some more detail. In particular I want to get nice look over lapping armour plates.


Thursday, September 23, 2010
Cup of Tea anyone?
The o so witty title to this post is due to the fact that I've spent the last day building a kettle out of nurbs. This has been an experience to say the least, mainly because I've spent the last day screaming "argh stupid nurbs" but that said nurbs are awesome, you would never get something looking this smooth as quick using polygons. The only slightly infuriating thing about the aforementioned nurbs is the number of times I've entered a value into the input of a tool and maya can't computer it (the number you've put in is bigger than the surface you are trying to round was a common one) and gave itself a fatal error. Suddenly incremental saves are awesome. But all in all it wasnt too much of a problem, but I have learnt that I am much more confident with a polygon based workflow than a nurbs one, I've discovered with nurbs you really have to think about the order in which you use certain tools (theres no point trying to trim a surface that you havent yet filleted to create the correct curves and stuff like this that messes with your head sometimes). The furthest down image is all the curves that had to be constructed in order to make the nice shiny smooth surfaces of the kettle (as you can imagine my outliner was a bit of mess by the end of this model)


Tuesday, September 21, 2010
Nearly Finished Head
The ear model involved extruding the hole I had left for it inwards, because continuing the extrution into the ear. I spent some time matching the vertices to the reference and then appended various sections together. At this point the majority of the detail was there it was just a case of filling in a few holes and getting rid of a triangle or two. Somewhere in the modelling process I have managed to pick up an ngon but as the ear wont be deformed I imagine it shouldnt matter too much. But I am going to go back and play around with the split polygon tool and see if I can remove it easily.


Head Topology Continued
Once I had created the important edge loops it is simpley a case of closing up the gaps in the mesh and tweaking all the vertices to match the shape of the reference. Then because of the way the topology was laid out it was simply a case of adding more edge loops in areas of detail (such as around the eyes and mouth) and once more tweaking the verts. There are a few more images to come in the next post of the ear under construction and the complete head.


Monday, September 20, 2010
Recently I have been doing a lot of work looking at topology during my little quest to make a decent model of a person. The head has been of particular difficulty to me, as it is such a hard thing to model. I have recently been able to get back onto my escape studios lessons for a little bit of help on the matter. Half the difficulty with modelling a head is getting the topology right or finding a good topology for you, this means making the right edge loops to best describe the face, and in the case of animators deform in the best way to allow you to make realistic looking animations. These screenshots are from a tutorial I have been doing which suggests a good topology, in the images I have constructed all the edge loops I need (and have all the specific points in place that all that remains to do is simple bridging and appending the polygons) this head was made by making live a hi-res 3D reference and using the cv curve tool and the loft surgace to create the edge loops. This is not my ideal work flow as it requires you to have either a 3D scan of a head (I dont have a 3D scanner) or have a hi resolution mesh (ie from zbrush) well if I could make a hi res mesh in zbrush I doubt I would have any trouble making one in maya. But that aside it has pointed out a good topology to work with, so the next challenge will be to make this topology from a box model.


Monday, September 13, 2010


Sunday, September 12, 2010


Subscribe to:
Posts (Atom)