Here it is folks, the finshed piece (we attempted to keep it off the great interweb until after assessment on monday, but hell we just wanted to show people). It has taken a group of four hard working animators 5 weeks to get to this point. For those who are interested we split our time up into; one week planning (storyboards, animatics, character/ armature designs, set designs, ideas for lighting, how we were going tell the story etc), one week building (armatures, sets, props), roughly two weeks animating and finally roughly one week compiling and editing (assembling in IMovie, editing frame by frame in photoshop, assembling sound track) and thats how we got here. Spread the video around any feedback would be good, ive got til monday to prepare my assessment presentation so if people mention good ways of improving it that I havent thought of I'm going to use them.
Showing posts with label Character Performance and Believability. Show all posts
Showing posts with label Character Performance and Believability. Show all posts
Saturday, March 20, 2010
They Call Me Trinity Test Videos
As with all animation (since our first term this has become somewhat engrained) its been incredibly important to test animations (check movement, characeters, props, lighting, everything basically). here are a series of test videos that we shot whilst filming They Call Me Trinity. We learnt a lot of lessons whilst filming, giving us a massive case of "if i were to do it again syndrome". All These tests were from scenes that I was animating or one of the animators on. In each scene we cycled animators, the set up was usually 2 animators, one person manning the camera and one person providing crit/ direction or a multitude of very usual roles (holder upper, back up animator, fetcher of tea (joke!))
Tuesday, March 16, 2010
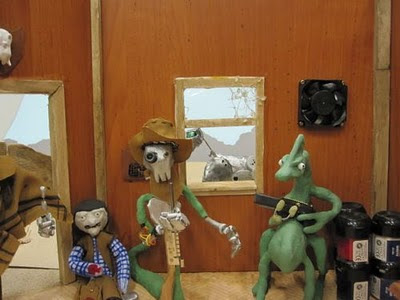
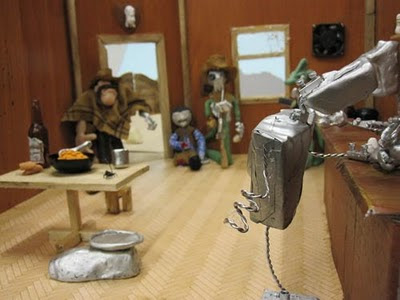
Behind the Scenes/Making of
Here are a collection of photos taken while we were filming our animation, hopefully they will give an insight into how the "magic" was made.


Monday, March 15, 2010
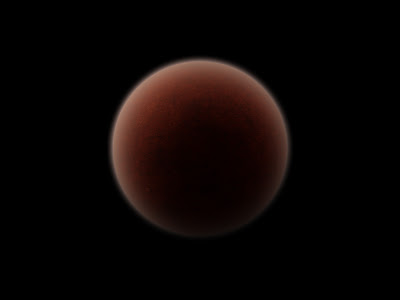
Planet
Ok so we are at a lovely stage with our stop motion animation "They Call Me Trinity", we are currently going through and editing bits, removing/adding things that aren't meant to be there, adjusting colours, applying film grains etc. Originally I had drawn an image from space to be an animated still at the start of the piece to help the audience suspend their disbelief and set the scene. However upon watching the finished animation this morning with plinky plonky piano music (silent movie style) I decided my planet drawing wasn't gonna cut it, for a start one drawn image at the start of a 3 and a half minute stopmotion animation would look a bit out of place. So I browsed the internet looking for the odd tutorial to help me make a planet in photoshop that would look the part. I found a very good tutorial on Deviant Art, and adapted it to the kind of colour scheme I felt would work, and here is the final image. Now just back to clone stamping sand for the 2300 remaining frames of the animation.......

Tuesday, March 9, 2010
Set Photos
Here are some photos of our set, lots of overlap with the pans around the set as they were taken at the same time. Followers of Richard Willock's animaton blog will notice cross over as we used one group camera for documenting behind the scenes tid bits. He got them up first so it will forever look like im copying them.

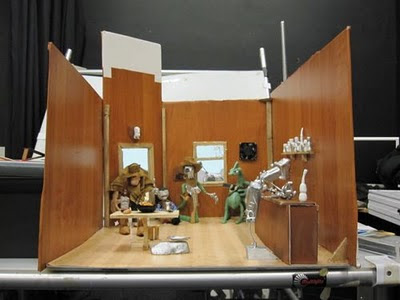
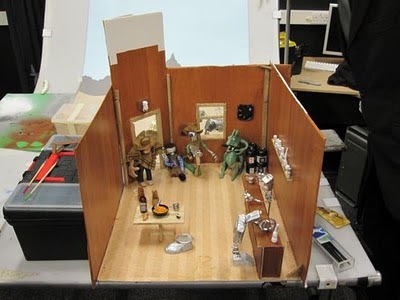


Set
This post is going to contain some videos we took that are simple pans around our saloon set showing off all the things we had made (props,characters and other set pieces, stuff we were generally rather excited about). We finished the entire set and upon consulting our tutor it was suggested that there wasnt enough attention payed to little detail. Our set was good but lacked really small finishes that made the scene. So we redoubled our efforts and started building tiny skirting boards, dirtying up wood surfaces, making metal characters less shiny and dry brushing like there was no tomorrow. The result was definately worth the work. The set really came to life and once a few final finishing touches were added we were ready to start filming.
Trinity Setup 1 from Richard Whillock on Vimeo.
Trinity Setup 2 from Richard Whillock on Vimeo.
Some Video References
Ok so its been a while since I last posted on my blog, I've been getting really caught up in the filming of my groups short "They Call Me Trinity" and havent been keeping up with posting all the behind the scenes photos/ videos of us animating, the reference videos we used to get a good performance from our characters and the images of the sets and props. This hopefully will be remedied this evening as I plan on going through and performing a bit of a blogging session to catch up. And also possibly some renders of where my current cgi modeling project is taking me. But anyway to video references, these videos have Richard, John and I performing quite a complicated wake up scene featured in the animation of the main character Trinity waking up after being dragged across the desert of a far off planet and arriving at his destination. We felt to give us the best possible chance of animating what we thought would be some complex shots we should each act out how we thought the scene should play out and use the videos combined with the animatic to base the animation on. We chose individual parts from each reference video and used them in the final animation.
Wake Up Toby from Richard Whillock on Vimeo.
Wake Up Jon from Richard Whillock on Vimeo.
Wake Up Rich from Richard Whillock on Vimeo.
Friday, February 26, 2010
Finished Animatic For They Call Me Trinity
Here is the final animatic for our character animation as we intend to make it. It is made up of three rather distinct styles as Richard,John and I each planned out a third of the animation. I guarantee in the final animation the style will be continuous. Enjoy
Tuesday, February 23, 2010
A Bit of Video Referencing
Pretty soon our groups whole animatic should be up. But we decided that we could do with acting the animatic out to give ourselves a video reference to work from when we are animating the stopmotion characters.
Cast:
Claire: Trinity (apparantly acting a man is hard) Shock Person 1
Toby: Thin Snakey Bounty Hunter, Wounded Man, Shocked Person 2
Richard: Bar Tender, Camera Man,
John: Beefy Bounty Hunter, Robot Waiter, Shocked Person 3
Cast:
Claire: Trinity (apparantly acting a man is hard) Shock Person 1
Toby: Thin Snakey Bounty Hunter, Wounded Man, Shocked Person 2
Richard: Bar Tender, Camera Man,
John: Beefy Bounty Hunter, Robot Waiter, Shocked Person 3
Armature Kangaroo

Here is the best photo of several I took of my recently made kangaroo armature, it is ..... interesting. There were plenty of lessons learnt making this armature. One of my key learning points is that it is very important to flesh your model out a lot, and then only put plasticine over the top. otherwise the model gets really heavy and hard to animate. Also in my quest to create a durable model I doubled up wire that wasnt really bendy enough to animate the character easily. Also make sure all of hte wire armature is made first... i left the ears until last and tried to glue them on which ended badly. Final learning point came from when it came to attach the armature wire for the legs to the spine, I had some issues, and accidently may hav given too much of the tail into the spine giving it a huge long neck and not enough tail. But you live any learn. Apologizies for that of chronological-ness with this post it is definately old now
Monday, February 22, 2010
They Call Me Trinity Update
Thought I would come on this fine evening and waffle somewhat about how my groups character animation is coming along. I have lots of sketchbook work from the planning stages (the last week) that will hopefully make it onto this blog at some point, but for now they are firmly within my sketchbook. The group conviened today to decide a few things and plan in a bit more depth the events of the forth coming week. We took a look at all the character designs everyone had done for various characters and assigned who would build specific armatures. We also made the decision to work as a collective on the set, over the course of this week (tuesday, thursday and friday) and keep the armature building to our spare time. We also went through the storyboards we had made and thought about each scene suggested any changes, and happily found that the vast majority was to our liking, so bar a few minor cuts the planning stages of the animation are complete. Now all that remains is a frantic week of building characters, sets, and miniature clothing (which has rather unfortunately fell upon the only girl in our group, which is not helping us seem like an equal opportunities collective). In the next day or two I hope to post up my animatic for the opening of the piece which I have been given the task of directing, shortly after I would like to make a colour animatic to demonstrate the look and feel I hope to achieve.
Wednesday, February 17, 2010
They Call Me Trinity, The Plan
On Tuesday we were set our next project for the upcoming weeks, until the end of term. My group chose out of the scripts: Frankenstein, They Call Me Trinity and Doves, to animate They Call Me Trinity. This script is the opening from a western. However we've chosen to adapt it somewhat. Our "western" is to be set on a harsh, barren, red planet. The opening scene contains a scene in a Bar, which we felt gave us a chance to be really creative. With plenty to reference when it came to designing the scene, the famous bar scene from Star Wars:A New Hope, for instance. First things first we set ourselves some minor deadlines of what we would like to have achieved by each week up until our deadline. By the coming monday we want to have designed all the characters in our scene, and also have storyboarded the script. We also want to try and get an animatic together, if only a basic one. We decided that we should all make drawings and designs of all the characters and pick features or whole designs for each character based on all the groups designs. I have also spent some time thinging about the look we will be attempting to make for the exterior scenes of the planets surface. I ve been thinking about lighting. lighting colour and also just making general mood boards for the kind of colour schemes that would suit the planet. Next week we will move onto creating the characters and the sets ready to start filming the following week.
Saturday, February 6, 2010
More Photos


This is again a horribly late post, when I meant to post these photos from two weeks ago blogspot was having issues with me, and so I forgot. Here are some photos of another character head design, its based on a small doodle I had in my sketchbook and i fancied experimenting with a bit of a different shape of head. I was quite pleased with these.
Friday, January 29, 2010
Task O' the Week


This week we've been slowing dipping into the world of plasticine character based animation, this week we were concentrating on sculpting heads. I choose to base my sculptures on the character designs I made during the Illusion of Life module. So Vaughnie the Viking is making his comeback but it three dimensions. To sculpt the heads I used styrophome balls to bulk the head out but keep it light. Then I lightly covered the ball in plasticine and began to sculpt up from there. I learnt a valuable lesson in that if using more than one colour of plasticine start light and go progressively darker. This stops transfer on my fingers darkening or dirtying the light coloured plasticine. Once I had built the heads I took a selection of photos using a DSLR (which it turns out I am useless at using) and lighting them with in different ways with a 650w spotlight. I also tried using a piece of red tracing paper to give off a red hue, but it was very pale. Next time I think it would work better with a transparent coloured plastic sheet.
Wednesday, January 27, 2010
Tests Etc
This is a bit of an-unchronological post. This is a post just giving a few behind the scenes bits from our experimental animation, that I posted the finished version of not so long ago. This post will have little video tests from the pixelation animation I was working on, along with a few of the many pictures we took to test out different lighting, before beginning animation. Along with some of the tests I helped by performing button clicking duties for the other half of the group on the "very experimental" animation.


Light Tests


Thursday, January 21, 2010
Experimentation Animation
Here it is the final edit animation from the experimental animation task set at the start of the week. The animation has been aptly named Money. Today we were simply editing the animation together from its componant scenes, including adding the rather fetching credits. Once we had finished that we decided that soundtrack was in order, and rather than spend a long time making a very realistic soundtrack we opted for being experimental and created the entire soundtrack using just the voices of the animators who made it. I think this works really well in this case. Particularly the rather epic song that was invented for the credits.
And now time for a little bit of an evaluate of the animation, in terms of planning and coming up with an idea as a group I feel we did very well, we started brainstorming (am I allowed to say this??) ideas from the topics we were given and trying to incorporate the bits and bobs we had brought along for experimental animation. Once we got ideas flowing we split into different groups to do the two smaller projects that would make the animation. From this we once again as a group bounced ideas of each other and in my group actually acted out our ideas before we storyboarded the final idea. (We really should have video'd this to show this planning). Once we had storyboarded that was planning complete. Because we opted to use no dialogue or work from sound initially we didnt dope sheet and just added soundtrack to fit the finished animation. When we were filming we performed tests which were useful in judging how the animation was going as we were using a digital SLR camera as opposed to a DV camera and Istopmotion so we werent getting the benefits of being able to onion skin and judge animation quality that way. As a result one or two sections look a little choppy particularly the growth of the tree which claire found difficult in her "costume" and the scene of myself lying on the floor covered in money as in order to get the angle for the shot Richard was holding the camera in mid air on a fully extended tri pod and was just taking shots quite blindly. This is the kind of shot we will be able to do better if we use the MILO camera.
Wednesday, January 20, 2010
A Bit of Pixalation
This week we began the second of our group tasks, our brief was to create a piece of experimental animation based around one of four topics; growth, sea/wildlife, dance or conflict. Our group approach was more towards finding an idea and then tailoring it towards one of the topics. Because of our group size we opted to use two different types of animation to show variety in the final piece. We chose to divide the animation in two and have a thought sequence set inside the main characters head in which he is looking for a solution to a worldly problem. This animated sequence would be made in a different method to the rest of the animation, this would allow us to explore the idea of another world (a concept often used in animated films) and also show a clear distinction between them. The sub-group I was decided we wanted to experiment with pixalation as a form of animation, and decided that the thought scene would be done using pixalation and characters acted out using ourselves and props. We felt this gave the piece a nice feel as the "imaginary" world would be visually similar to our world and the "real" world to look exagerated and animation. We felt this was the inverse to the norm and gave the piece some atmoshpere. We also used very different colour schemes in the two world bright and vibrant for the "real" and black and white for the "imaginary". This video is the entire thought scene before it had been edited and filtered to be black and white. I will be uploading the finished edit at a later date along with our video tests and the many different lighting test we performed before we began to animate. Also at a later date I will post the other half of the animation, tests, and the fully finished and edited animation.
Thursday, January 14, 2010
More Stopmotion Animation
I've started to really get into stopmotion animation (at the moment still using stickfas figures) and so I made two more short clips today. I decided to spend some time working on walk cycles as I felt this is an area I just need to know like the back of my hand. So armed with a stickfas figure and the Animator's Survival Guide by Richard Williams I set about making a walk cycle. First of all unlike the walk cycle that I helped make in the group session on tuesday, this walk cycle is not made using replacement technique. I found that technique far too much of a headache due to not having either eight or sixteen figures to effectively make a walk cycle. This does mean that the walk cycle is lacking some of the smoothness you get by using replacement as my eye for creating a really smooth animtion is not going to be as good as those who have spent many more years doing this. For my first cycle I chose to do the walk cycle on eights but doubled it to draw it out a little bit longer.
I am pleased with the walk cycle, I think it runs smooth enough although I think I can catch a glimmer of a slightly out of place action somewhere in the middle. Following the walk cycle I decided to try something new and opted to make my character run. This however turns out to be a little bit trickier that anticipated purely because I am not yet used to stopmotion and that your model will not float in mid air on nothing but good will. As a result I have to stack the feet with blu tack (my only readily available resource) in order to give the impression of the character being off the ground. The animation works quite well but is only just passable in points where the character should have less contact with the ground.
Minor problem I realise you cant loop videos on blogger, sorry bout that.
Tuesday, January 12, 2010
The Beginning of Stop Motion
Today was the first day we were sitting down and starting the stop motion animation process, our brief for this week was to create a walk cycle using Replacement technique, this is an animation technique quite commonly used an example of which is the animated childrens program Pingu. Replacement means using many different models each posed in a different way to make the animation. Our group found this quite challenging as we had 6 models but to do a walk cycle smoothly by replacement we would have liked to have had 16 different poses. As a result we had to reposition certain models to get the extra positions and this was more time consuming when we would have been better re-posing one model again and again. This is a more commonly known stop motion technique, which we used in our later animations the break dance and the Zoommbiieesss animation that we started to make to test our ability to move six characters per frame.
This was the group walk cycle
Evil mastermind claire Manson is responsible for this one, The rest of the group offered camera and lighting support and when it came to the more complex jump movements help with the very technical aspect of rigging the model in mid air with bits of Tom Doyle's hair.
Finally this is the first two scenes of our "feature length" Zombie epic, we went for a very very staggering approach when it came to making the zombies walk or rather shuffle at high speeds. Over the course of the day we learnt some valuable lessons about lighting (and how to avoid the random changing in lighting colour demonstrated in the walk cycle), we learnt a lot of points that will be taken into account when making our own armatures for example making them big enough to be easily manipulated and not too fiddly.
Subscribe to:
Posts (Atom)