
Thursday, December 1, 2011
Test Render
This image is a test render composite using ZBrush's BPR rendered, it renders the images and lets you save out its separate passes and composite them in photoshop. This is a really simple test, I will be doing several more passes on the final renders to get specular highlights and some sub surface scattering. But overall I like the result, it will look a lot better when I have created a customised lighting setup. As you can probably see the texture painting isn't yet finished but I'm making progress, I've started to block in values on the hair and teeth, as well as progress to even out the final skin tone. I want to strike a happy balance between getting a varied skin tone but not having the texture look like it was painted by Seurat. As pointilism is all well and good but it would like to be able to get some close up renders without showing off how dotty the texture is.


Wednesday, November 30, 2011
The wonder that is Polypaint
Ah polypaint, this post is actually going to be a post about the texturing pipeline I am using to texture my beastman bust, but seeing as I'm using polypaint a large amount in the process there will be a fair bit of waffle about how/why it's good. I'll start briefly with a "what is polypaint/why is it good?" Polypaint is a feature in ZBrush (and I also believe you can do similar things in Mudbox but don't quote me on that) which allows you to apply colours directly to polygons. Thus texturing you object. Now the advantage of ZBrush is that providing your computer can manage it can cope with millions of polygons per subtool (and many subtools) and up to a billion polygons with HD sculpting. That's a lot of polygons you say, well you are correct and its a lot of potential for storing colour information. If you were to unwrap a model a texture it in photoshop and 2K texture has 4,194,304 pixels of colour information, but unwraps are never 100% efficient leaving a sizeable chunk of that unused. This means that if you have a model with more than 4 million polys you are getting more colour information by painting straight onto the model. Polypaint also has the benefit of being applied directly to the surface of the model making it much more intuitive a process. Now my favourite bonus of using Polypaint is that because the information is stored in the polygons if you move them the information is still there. If you unwrap a character and need to make changes you often going to need to re-unwrap and in some cases do some serious re-texturing work. I hate being at the stage in modelling when you are pretty sure you don't want to do any more to the model but not 100%. Like in the case of this model. I know I want to get the texturing started but I may want to make tweaks when they occur to me and I don't have the luxury of time right now. Anyway onto the model.
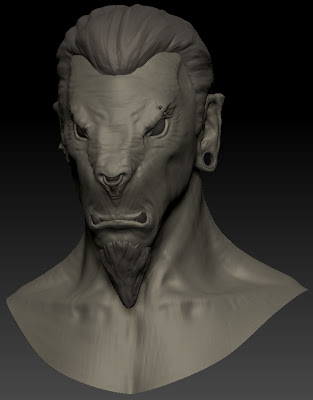
First step is to apply a base colour to the model. I'm going for a light grey brown colour for this character, as I have a nice reference of a mountain goat and I rather like the light fur/skin that would blend in well in snowy mountains.
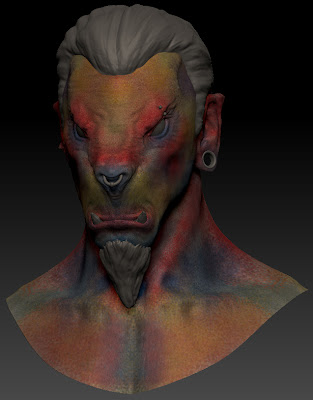
The next step is pretty garish, I apply on a separate layer bright reds for areas of high blood flow, blues for cool areas, purples for recesses, and yellows to add variance to large areas of skin. This will be largely covered up by later layers but gives the skin realistic variation in the texture without are sub surface scatting materials applied.
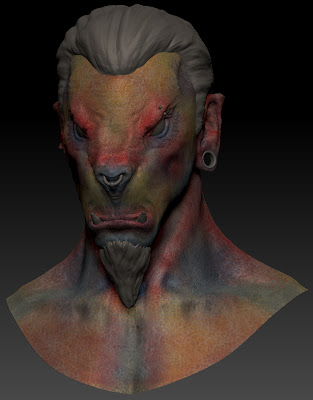
I then used an alpha brush on a new layer which desaturates the alpha and breaks up the shapes giving a more skin like feel and reduce the intensity of the skin variance layer.
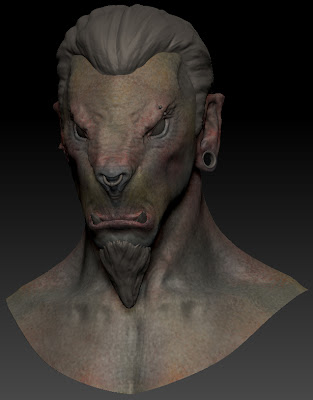
The next layer I start with low opacity brushes to bring back some of the base colour over the top of these layers bringing it back closer to the skin colour I want.
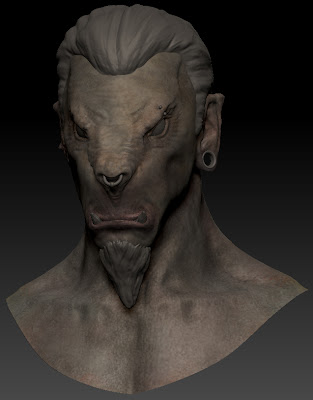
This next layer is a continuation on from the last one, I am starting to model some of the texture adding slight highlights and lowlights to emphasise features. This is by no means a finished texture. From here I will continue to refine the skin colour, returning to previous layers where I need to. I will also use textures and photos to paint details directly onto the model. Once I've finished the bust I shall then move onto the hair and accessories.

First step is to apply a base colour to the model. I'm going for a light grey brown colour for this character, as I have a nice reference of a mountain goat and I rather like the light fur/skin that would blend in well in snowy mountains.

The next step is pretty garish, I apply on a separate layer bright reds for areas of high blood flow, blues for cool areas, purples for recesses, and yellows to add variance to large areas of skin. This will be largely covered up by later layers but gives the skin realistic variation in the texture without are sub surface scatting materials applied.

I then used an alpha brush on a new layer which desaturates the alpha and breaks up the shapes giving a more skin like feel and reduce the intensity of the skin variance layer.

The next layer I start with low opacity brushes to bring back some of the base colour over the top of these layers bringing it back closer to the skin colour I want.

This next layer is a continuation on from the last one, I am starting to model some of the texture adding slight highlights and lowlights to emphasise features. This is by no means a finished texture. From here I will continue to refine the skin colour, returning to previous layers where I need to. I will also use textures and photos to paint details directly onto the model. Once I've finished the bust I shall then move onto the hair and accessories.
Beastman Modelling Continued
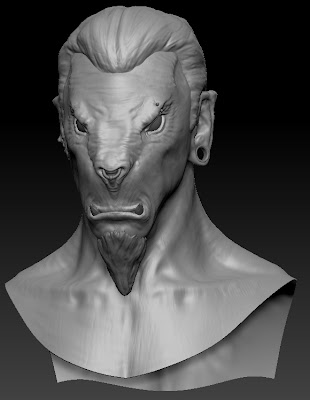
The last day or so has been that very awkward stage of modelling, there is lots of little changes and tweaks to be made that overall will improve the model, but they can often be hard to see. The trick is trying to get fresh eyes on your work where ever possible. The easiest way to describe what I've been working on in these images is breaking symmetry. Symmetry is a wonderful time saver but there comes a point where you have to say no more. This is difficult to do because the brain is programmed to tell us that symmetry is good, the idea of a perfect face is one that is symmetrical, however nothing looks more faked/cgi/not really than something perfectly symmetrical.
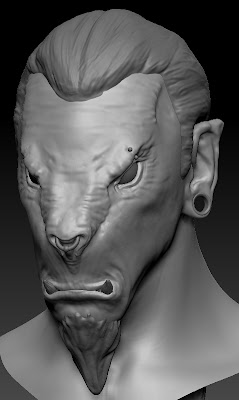
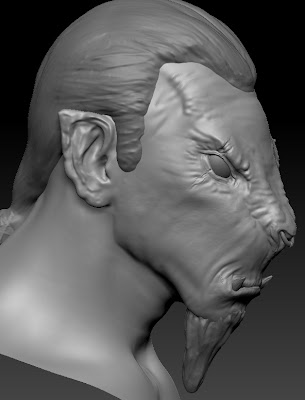
Sticking to changing big shapes/details first I set about changing the piercings on the model to something a bit more final than the placeholders I had put in before. I liked the idea of the ring through the nose, but have three of the same piercings wasn't as varied or visually interesting as it could be. So I made they eyebrow piercing a bit more subtle and added a stretcher to his right ear. I really like this simple addition for several reasons. Firstly it makes him look less like a pirate. Secondly it forces the shape of the entire right ear to change breaking the symmetry of the face. Finally like the negative space it gives the characters silhouette, making the silhouette more interesting.
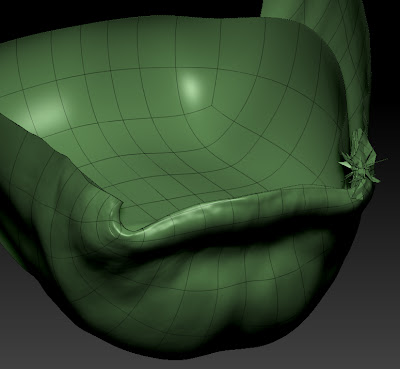
I did however have to do some slightly menial tasks during the process of cutting a hole in the characters ear. I cut the new geometry at the lowest subdiv level and then re-projected all my lovely hard work back onto the new base. However this often needs a bit of clean up afterwards. As you can see in the screenshot of the corner of the mouth ZBrush didn't know which part of the mouth it should be projecting to so I had to go back in with morph and smooth brushes to fix these little bits.
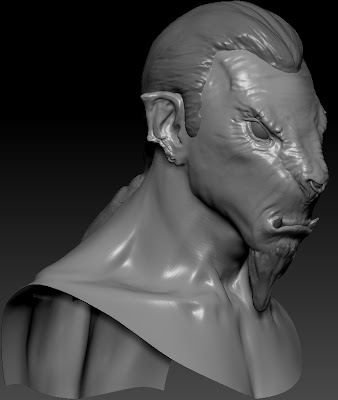
The next step was to introduce some scarring to the left ear, this was another suggestion put forward by one of my fellow students. I liked the idea creating the some details that looked as if part of his ear had been bitten. I thought this sat well with the character as I wanted to give him a few war wounds but not making him look ridiculously battle warn. Bitting someones ear seems like the kind of wound you might get if you were fighting as a child which I felt fitted. The next area I worked into was defining the shoulder region that is going to be in the final shots, It's a fairly simple region if your not on steroids and most of the muscles are shown through suggestion. After I had laid these shapes down the whole model looked a lot better, as previously this area had been very smooth and plastic-y. That said the entire model still had a relatively plastic-y surface to it. Fixing this was the next port of call.
I break up the surface and stop it being perfectly smooth I used alpha brushes at the highest subdiv level at quite low z intensities so they didn't create protruding details. Then I would drop down a level and smooth them out. Overall this helped to give the model an uneven surface that wasn't chucking up long specular highlights. It gave the model the 3D equivalent of teeth on a canvas.


Sticking to changing big shapes/details first I set about changing the piercings on the model to something a bit more final than the placeholders I had put in before. I liked the idea of the ring through the nose, but have three of the same piercings wasn't as varied or visually interesting as it could be. So I made they eyebrow piercing a bit more subtle and added a stretcher to his right ear. I really like this simple addition for several reasons. Firstly it makes him look less like a pirate. Secondly it forces the shape of the entire right ear to change breaking the symmetry of the face. Finally like the negative space it gives the characters silhouette, making the silhouette more interesting.

I did however have to do some slightly menial tasks during the process of cutting a hole in the characters ear. I cut the new geometry at the lowest subdiv level and then re-projected all my lovely hard work back onto the new base. However this often needs a bit of clean up afterwards. As you can see in the screenshot of the corner of the mouth ZBrush didn't know which part of the mouth it should be projecting to so I had to go back in with morph and smooth brushes to fix these little bits.

The next step was to introduce some scarring to the left ear, this was another suggestion put forward by one of my fellow students. I liked the idea creating the some details that looked as if part of his ear had been bitten. I thought this sat well with the character as I wanted to give him a few war wounds but not making him look ridiculously battle warn. Bitting someones ear seems like the kind of wound you might get if you were fighting as a child which I felt fitted. The next area I worked into was defining the shoulder region that is going to be in the final shots, It's a fairly simple region if your not on steroids and most of the muscles are shown through suggestion. After I had laid these shapes down the whole model looked a lot better, as previously this area had been very smooth and plastic-y. That said the entire model still had a relatively plastic-y surface to it. Fixing this was the next port of call.

I break up the surface and stop it being perfectly smooth I used alpha brushes at the highest subdiv level at quite low z intensities so they didn't create protruding details. Then I would drop down a level and smooth them out. Overall this helped to give the model an uneven surface that wasn't chucking up long specular highlights. It gave the model the 3D equivalent of teeth on a canvas.
Tuesday, November 29, 2011
Female Head Model
I've decided to start posting up the work in progress shots from a female head model I made a little while back and analyse/evaluate the model. My brief for this female head was to create a highly detailed model based on some reference photos. She also would have to be bald/have a shaven head, which sounds easy, just don't model hair. But it can be quite tricky to make sure the shapes of the head that are normally obscured look right.
I started quite typically with an established head base mesh, the one from my previous male head sculpt, I then used some 3d.sk reference shoot photos as reference for my to push and pull verts until it pretty much matched the reference. The problem with using reference images as a guide is even good reference shots don't line up and whilst you can use photoshop to scale and rotate the images so that the major landmarks match up you are still dealing with perspective distortion etc. So I like to follow the images as much as possible then get the model over into zbrush sharpish where I can very easily use the move brush to tweak forms.
This image above was how the head as looking leaving Maya, it looks rather strange, which is the result of problems with reference images and also working on half the model then mirroring. When you only work on one visible half it often doesn't look right when its mirrored. I set about correcting some of the shapes until I got to the image below, which is a massive improvement although theres still a lot left to get right in secondary forms before I begin to detail. I posed the mouth more neutrally, and need to construct the inside of the mouth before I begin fixing the lips. The eyes need a lot of work but they are at least placed correctly in the head which is almost half the battle.

This image is of the head a bit further along the process, I have altered some of the profile shape of the nose and sculpted the ear to match the reference which is helping a lot, I've also softened the line of the jaw which is making the sculpt read as more feminine. When drawing the female form it's important to use lots of soft lines and only draw lines/shadows based on the light source thus limiting the lines on the face. These things are much harder to do in 3D. I still need to get the balance of detail right to make sure she doesn't look plastic and smooth but at the same time excessive detailing can very quickly age a character.

I started quite typically with an established head base mesh, the one from my previous male head sculpt, I then used some 3d.sk reference shoot photos as reference for my to push and pull verts until it pretty much matched the reference. The problem with using reference images as a guide is even good reference shots don't line up and whilst you can use photoshop to scale and rotate the images so that the major landmarks match up you are still dealing with perspective distortion etc. So I like to follow the images as much as possible then get the model over into zbrush sharpish where I can very easily use the move brush to tweak forms.

This image above was how the head as looking leaving Maya, it looks rather strange, which is the result of problems with reference images and also working on half the model then mirroring. When you only work on one visible half it often doesn't look right when its mirrored. I set about correcting some of the shapes until I got to the image below, which is a massive improvement although theres still a lot left to get right in secondary forms before I begin to detail. I posed the mouth more neutrally, and need to construct the inside of the mouth before I begin fixing the lips. The eyes need a lot of work but they are at least placed correctly in the head which is almost half the battle.

This image is of the head a bit further along the process, I have altered some of the profile shape of the nose and sculpted the ear to match the reference which is helping a lot, I've also softened the line of the jaw which is making the sculpt read as more feminine. When drawing the female form it's important to use lots of soft lines and only draw lines/shadows based on the light source thus limiting the lines on the face. These things are much harder to do in 3D. I still need to get the balance of detail right to make sure she doesn't look plastic and smooth but at the same time excessive detailing can very quickly age a character.

Nariko Character Evaluation
Heavenly Sword is an action-adventure/hack and slash game created by developer Ninja Theory, publishing by Sony Computer Entertainment Europe. It was one of the launch titles for Sony's Play Station 3.
Heavenly Sword has a very interesting story revolving around concepts such as prophecy, tyranny, sacrifice with an underlying stance on futility of human conflict. The story begins with a brutal warlord known as the Raven King who controlled the land by destroying all who opposed him. Answering the prayers of those he subjugated a warrior descended from heaven and defeated the Raven Lord, after the battle the warrior disappeared, but his weapon remained. From then on men greedy for power fought over the sword, and over time it became fuelled by their blood lust, the sword began to absorb the life of whoever wielded it. Eventually a clan of warriors intervened in the cycle of death and destruction surrounding the sword and took it upon themselves to protect the sword from those who sought its power, waiting for the day when it was prophesised that the heavenly warrior would return and lead them to the promised land.

Nariko is even at the games outset an incredibly tragic figure, her only friend in the world is a troubled and disturbed young orphan named Kai, who Nariko treats as a sister. Her relationship with her father is an uncomfortable one to say the least, he views her as a constant disappointment as she was not the hero prophesised. Shen (Nariko's father) takes a role more of a tutor that her father, attempting to separate himself from her emotional, but continues to teach her and raise her as a warrior. He is filled with many conflicting emotions over Nariko, hatred for failing to fulfil the prophecy and for taking her mother from him, and also guilt that he tried to take the life of his newborn daughter, and an uncertainty as to whether he made the right decision not to. From the beginning of the game the characters are complex in their own right, but better still they actually relate to each other making the whole story feel much more real.
Visually the game draws a look from eastern culture, and I believe that Shen and Nariko's relationship also draws a lot from the feeling of disappointed that parents in ancient

Nariko definitely falls into the archetype of the hero. Despite all she has been through with her father and her clan, she still opts to make the ultimate sacrifice and offer her life to the heavenly sword in order to free them from and defeat King Bohan. Nariko is driven by a rage fitting with her fiery nature. She wants nothing more than to destroy King Bohan and free her clan. Despite this rage all the way through the story she is still incredibly selfless one of the key character traits of the hero. She even shows mercy on King Bohan when she has defeated him and the Raven King has left his body, leaving him crippled. Rather than let her rage get a hold of her and finish him, she lets him live at the request of his son Roach.

I think one of the key things that helps Nariko to work as a wonderfully complex and tragic heroine, is the way her face is animated, Heavenly Sword was one of the first games to use facial motion capture, even having Andy Serkis working as the Dramatic Director and voicing/acting a character himself. In this way so much of Nariko's character is taken and then pushed even further by the performance of Anna Torv, and using motion capture software allows the facial animators to really build of the subtlety of performance and the way Anna Torv delivered her lines.
Monday, November 28, 2011
Evaluating Character Design
I am going to spend some time de-constructing the character of Raziel from the game series Legacy of Kain, and potentially also give the character of Kain the same treatment as the two characters are central to the interesting story of the games and their interactions are as interesting as their individual characters.
 Visually Raziel is very distinctive, he appears very skeletal as much of his humanoid vampire form was burnt away leaving muscle and bone exposed. He is missing his lower jaw which he covers by wearing the banner of his former clan as a cowl. He skin is blue which has lots of meaning attached to it as every colour does. In the context of the story his blue skin is based on Hindu mythology in which blue skinned characters are known for depth of character and the capacity to fight evil. Raziel still retains the tattered remnants of his wings which Kain tore from his body,
When Raziel is first introduced to the audience he is a Vampire Lieutenant (not the sparkly kind) of the self proclaimed Vampire God Kain. It is later revealed that Raziel was raised to be Kain's Lieutenant from the body of a Sarafan Warrior Priest. The Sarafan being an order that hunted and killed nearly all the vampires in Nosgoth. Raziel is the first of six lieutenants of Kain and has served him for over a millennium, at the beginning of the game he is revealed to have entered the state of change and evolved a new vampiric gift before his master. Seemingly for this transgression he is executed by being thrown into the lake of the dead. Raziel was burned alive for hundreds of years before his torment receded and he is brought back by a creature known as the Elder God. He is transformed in a wraith who inhabits the spectral realm. The Elder God gives Raziel the means to travel back to the physical realm, where he can maintain his form by absorbing souls of the living, so that he can get his revenge on his master and brothers for destroying him.
 Visually Raziel is very distinctive, he appears very skeletal as much of his humanoid vampire form was burnt away leaving muscle and bone exposed. He is missing his lower jaw which he covers by wearing the banner of his former clan as a cowl. He skin is blue which has lots of meaning attached to it as every colour does. In the context of the story his blue skin is based on Hindu mythology in which blue skinned characters are known for depth of character and the capacity to fight evil. Raziel still retains the tattered remnants of his wings which Kain tore from his body,
Raziel sees himself as a fallen angel, risen again to exact his revenge as the reaver of souls. He is very self righteous and it is his greatest flaw. It's negative qualities light this that really helps give the character depth rather than being two dimensional. Early on in the story Raziel is very much driven by his emotions. Initially he is totally motivated by rage and lust for revenge. He comes to understand that he was not destroyed out of petty jealousy as he had believed, and that it had all been part of some grand scheme of Kain's, in which he was another pawn. Raziel is very reluctant to being used by Kain, although he ultimately finds himself used time and time again by the various characters of the story. This is due to the fact that following his destruction he was reborn as a creature of free will and able to change his destiny and with it the fate of Nosgoth. Raziels hatred for Kain never ceases but he starts to be more motivated by the want to shake of the shackles of fate and be able to exert his free will.
The story of the Legacy of Kain games revolves around destiny, fate and the characters trying to avoid their predetermined paths in life. Raziel is trapped in a highly cyclical destiny, he is himself a paradox that time needs to resolve and how it is resolved will have massive consequences for the world of Nosgoth. He is ultimately a tragic character who fell from grace and believed capable of redeeming himself. However he comes to realise that also he is creature of free will his destiny is predetermined and although his free can change the destiny of all the other characters of the story he can only postpone his own, rather than avoid it entirely. He is driven by a fear of his ultimate destiny which is to become the hungering spirit that dwells inside the soul reaver.
The story of the Legacy of Kain games revolves around destiny, fate and the characters trying to avoid their predetermined paths in life. Raziel is trapped in a highly cyclical destiny, he is himself a paradox that time needs to resolve and how it is resolved will have massive consequences for the world of Nosgoth. He is ultimately a tragic character who fell from grace and believed capable of redeeming himself. However he comes to realise that also he is creature of free will his destiny is predetermined and although his free can change the destiny of all the other characters of the story he can only postpone his own, rather than avoid it entirely. He is driven by a fear of his ultimate destiny which is to become the hungering spirit that dwells inside the soul reaver.

Although Raziel is the games protagonist he falls most into the shadow Jungian Archetype, which normally contains villains. He is essentially an evil murderous character but he has morals and ethics like all characters. This is what makes him such interesting in my mind. Added to this his tragic story the player can see how Raziel is driven to the things he does and despite him being an evil character we never feel like we as a player don't want to be him.
Beastman Modelling
After concepting various different directions I could take the model I experimented with a few in 3D. The mohawk whilst the concept looked good on paper (even though it didn't make a lot of logical sense I was still reluctant to dismiss it outright) didn't work as well in 3D, the large amount of bald head draw a lot of focus away from the rest of the character. So without detailing or spending two long on the model I realised I was going to have to bin the idea.

I moved on to blocking out the hair volume that had looked quite promising on paper, and even at an unrefined stage this was working with the overall sculpt and once I have worked into it a bit more I'm sure it will look even better.


Finally I used an existing male base mesh to attach the head to, this would allow me a bit more shoulder for my bust, and also then make the model ready for when I want to create a full body version of the character. I spent quite a long time retopologising the neck area, as this hadn't been done particularly well when I did my original base mesh, and I also fixed a few areas around the eyes improve the general edge flow of the model for the better.


I moved on to blocking out the hair volume that had looked quite promising on paper, and even at an unrefined stage this was working with the overall sculpt and once I have worked into it a bit more I'm sure it will look even better.


Finally I used an existing male base mesh to attach the head to, this would allow me a bit more shoulder for my bust, and also then make the model ready for when I want to create a full body version of the character. I spent quite a long time retopologising the neck area, as this hadn't been done particularly well when I did my original base mesh, and I also fixed a few areas around the eyes improve the general edge flow of the model for the better.

Subscribe to:
Posts (Atom)