Part of Business of Animation is to give a quick presentation on some videos that have influenced us. Mine demonstrate my extreme love of stuff with awesome action sequences and impressive styles that look different from the stereotypical "cg" style. The other big influence (probably the one thats got me sitting here) is game cinematics and how flipping awesome they are, so I picked out a particular favourite (or two)
Monday, January 31, 2011
Mood Boards
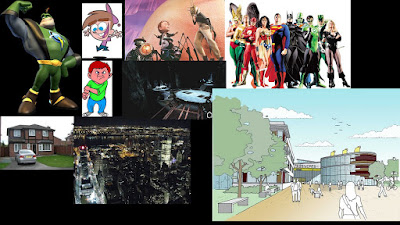
I realise this is the first post I have done for my business of animation module that I've been working on for something like three weeks now, this is very bad of me, I will attempt to bring you up to speed. Here goes. For this module we are working to try and complete a live brief, by way of preparation for what it is like in the industry. I chose to try and meet a D&AD brief set my disney tasking the participants to come up with a original character and include it in 30 to 60 seconds of animation. I really like this brief as it gave me a chance to sink myself into more character design (loves it) and character modelling (really love it, designing characters is cool but being given other peoples designs that are more awesome than your own and making them is just ... ah love it) and it also would mean I could do a piece of cg animation properly for the first time since intro to digital last year, which seems like a long time. Anyway this week is going to be my last week of pre production and so I would talk about the idea. I have created a character (will go into more detail when I start posting up drawings specifically on him) and I spent some time thinking about what my 30 seconds plus of animation would be, a minute still isnt loads of time to go nuts in. Then following a talk with Curtis Jobling, the creator of Bob the Builder, who spoke about how kids tv shows needed to be able to fill first time watchers in with the backstory of the show and its characters, and due to the short lengths of episodes there isnt much time for this. The way this is overcome is by including it in the opening for the show! Idea much, show intros are never more than a minute, in fact thats really pushing the limit. So I thought great I will create the character and the story behind it and use my animation time to create the intro to one episode and show off the charater in all his glory that way. The mood board below is a collection of references that are applicable to the story. That is to say it will involve: Superheroes (although its not centred on them), a school boy, a change of location, bullies, and lots of lessoned learnt that will be very relevant to my target audience of 11-14. I have waffled a lot in this post and will try and be a bit more concise/ make more sense in future posts, I really have a lot to catch up on blog wise that is far more than one pot can do

Global Games Jam

This weekend just past I had the opportunity to take part in a Global Games Jam, an event which as the name suggests takes place world wide, and also reallly enjoy jam (we were each given a jar of indiecity jam as a joke present). What can I say about this event, well for one it's pretty hardcore. On friday evening we arrived at Birmingham City University's TIC computer room and met the fellow Game Jammers, roughly over 30 people including Jammers and a few event organisers. At 7 ish we were given a quick keynote presentation and told the theme of the jam, which was extinction. We then had 48 to design and create a game from scratch! This seems like a dawnting task to anyone who has yet to make (or in my case yet to finish) their own game. So we got too it and I, like many others didnt sleep until getting home on sunday night once the jam was over, a very hardcore weekend. I worked in a team of four jammers, two artists myself include working with two programmers. We decided we wanted to make a 3D game using Maya and Unity. We started spit balling ideas and decided on something a bit survival horror-y set in a derelict victorian hospital, that was a front for a lab which worked on bio weapons ( a bit Resident Evil much??, this back story was pretty much created in the last 10 minutes of the game we had a brief story/background at the start but thought mainly about gameplay mechanics and how we would implement them), anyway one of the weapons and air born creature without a physical form (manifested as a cool but scary cloud of smoke/particle mess) escaped and has been making everyone extinct. Your task was to escape the maze like destroyed hospital (which was in the dark) with nothing more than you wits and a flash light to guide your way, the handy thing was that the creature doesnt like light and so backed away from you when you shone your light on it (a handy coincidence). We also created various platformer like obstacles for the player to overcome; pit falls, ledges you had to shimmy along slowing and doors you had to spend time bashing open. The best bit was definately that we managed to finish the game in 48 an achievement I am so impressed we managed. But even better at the end each of the 7 games made ( seven groups of jammers) presented what they had made, which was awesome as we spent most of our time working and not being nosey so it was good to see everyones outcomes. The games were then judged by the lecturer of the BCU programming course, Paul Taylor of Mode 7 games and Daniel Jones of Binary Tweed, and the team I was in came joint first with a team from Nottingham University's Dev Soc. We were very surprised/overjoyed and we rewarded with bags full of presents from Blitz Games. So in conclusion games jams like this one (and events like X48) are awesome. Best weekend ever
Monday, January 24, 2011
Character Modelling Critique and Re-Model
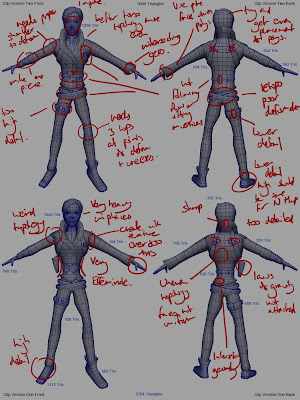
With my Game Character Rig pretty much complete, I am still playing around with a few bits and bobs like parenting weapons to hands etc but thankfully this work can continue after the character is skinned to the rig, I have started to look critically at the main protagonist model, and soon I shall direct my attention to my low level enemy. The reason for this sudden critique is that for the last however many weeks the various rigs I have been building have been the limiting factor to how well the character would animate, ie the foot can't be moved that way etc. Well now that the rig is pretty much complete and is I think a very good rig, I realise that the character model isn't as fantastic as perhaps I thought it was when I first built it. After the first rebuild of the character there wasn't much wrong with the shape of the character as I had been working very closely with the concept art I was given, however the big issues with the character come with topology, which was much better in the second version than the first however it still leaves something to be desired. There is also the problem of where polygons are currently allocated, having done a bit of research during this model crit I discovered one of my feet has over 1000 polygons, now the converse shoes does look very nice but for how much its going to be seen in a 3rd person game and the size of the detail this is completely unnecessary so thats going to change. This is a big thing across the entire model I've noticed there is a lot of small detail with high poly counts, not surprising as details require more polygons to create, however I really should have spent more time considering the on screen size of these details and how many polygons comparitively I was spending in these areas. This critique has highlighted when you texture a model and turn off the wire frame you could have two identical models next two each other and you wouldnt realise that one has a really good topology for animation and no wasted polys where as the other has a very uneven polygon placement and would deform terribly. My task at the moment is to make my main character model the former.

Saturday, January 22, 2011
Drawing
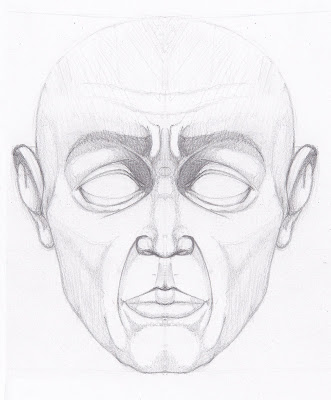
This posts label is actually deceiving, as this drawing wasn't drawn from life, and neither have I cheated by drawing from a photo. Recently I've been spending as much time as I can spare going through anatomy books and generally practising anything that will help me properly understand the human anatomy and proportion. The general idea has followed a similar style to the french method of sculpture called ecorche (there should be some accents in there but I can't remember how to insert them on keyboards) in which the sculptor models the skeleton first, then the layers of muscles and finally the skin. The idea being that by understanding everything this is under the skin, the bones that give the figure its shape and proportion, the muscles and how they allow the body and the skin to move, that when the finally come to adding the skin and surface detail they have incredibly accurate sculptures. The theory is that once you fully understand what is underneath from many angles (I've been working in front, side and back orthographic views and also creating 3/4th view drawings) you can create a very detailed study of the human form. Over this year I have really learnt the lesson of making sure that you actually understand what you are trying to create or reproduce (not just in drawing but in animation, modelling, texturing etc) to properly create a human figure in 3D model form you must actually know how it looks from all angles rather than having an idea and filling in the gaps with how you mind thinks it looks rather than knowing how it looks. The same goes for animations, how can you create a realistic movement if you dont understand what you are doing during that movement, hence why the animators always try and act out what they are animating. I hope you enjoy the drawing its far from perfect but I feel its a huge improvement and a good progression to where I want to be with my drawings.

Friday, January 21, 2011
Texturing
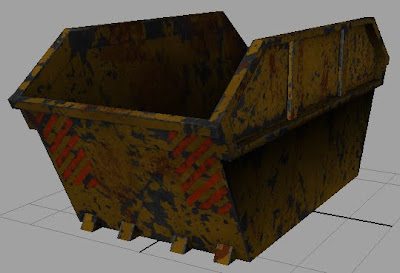
I've been practising my texture painting recently on assets for the game project. I learnt a lot about texturing while creating my witchdoctor piece and also my steam robot character (which I mainly did everything wrong and thus learnt lots of valuable lessons). The big differnce in my current texturing work and my early work is that I am really relying a lot less on photos, although I still use them sometimes for colour reference (using the colour dropper to pull rust colours out of a photo for instance), but other than that I try to completely hand paint my textures. There are several reasons for this, first eventually you are going to want to create something that it will be hard or impossible to find photo reference or even go out a take your own photos, and secondly although hand painting a texture may seem like a lot of work using photos as textures still requires a fair bit of playing around to make the photo useable. For instance you are always going to have trouble, especially on metal surfaces making a photo of metal look diffuse (as you want no strong shadows or highlights in your colour map, this is all handled by specular and other maps), and chances are you are going to have to spend some time removing discerning features from the photo so that if the texture is tiled or used multiple times people dont notice features that identify it as the same texture. Photoshop really has so many good features that you can create amazing textures (I'm not saying mine are but I have seen incredible work that I'm aspiring to), I have now cracked making metal textures appear a lot more realistic using nothing more than grunge brushes and layer masks. But anyway enough waffle, at the moment I'm pretty pleased with how the texture is coming a long, I'm working on building in rust at the moment, this is coming along much better since I found a really good set of rust brushes, now its just a case of playing around to get the best results. Its always great to preview a texture on a mesh as it's amazing how good you can make a simple box look with the addition of texture.

Thursday, January 20, 2011
Environment Modelling
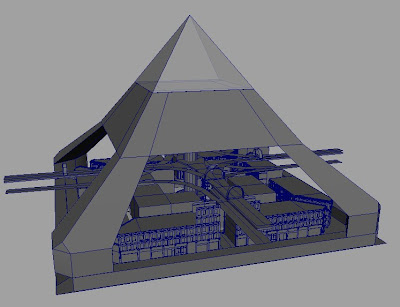
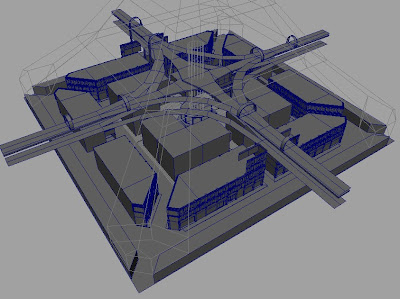
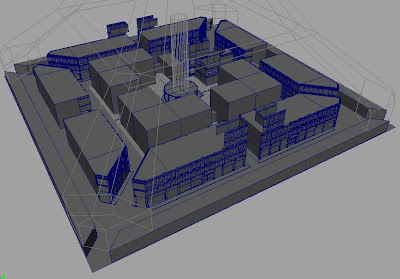
Here is someone environment modelling I've been doing for our game project. We had a few visual ideas that the programmers wanted included and that as a group we decided would make impressive visual set pieces. The pyramid construct was key to what the programmers wanted from the second level of the game, in my original concept art it was going to be on group level surrounded by the city buildings, however a key features that the group wanted included as part of the theme for all of the environments was the highways/train tracks running above the area, meaning we had to think of a different way of working in the pyramid structure. Some of the things I looked at as reference was the streets of Paris and other european cities such as Budapest for architectural reference, the are also areas of birmingham that influenced the way I modelled the buildings and streets to match up with the ground plan concept I was given. I also liked the idea of a second rail system above the streets much in the style of chicago's EL. At the moment the city is in somewhat of a blocking stage, although it has quite a lot of detail considering. This is due to roughly a quarter of it being built for the demo and the rest just being blocked in. I am now going through removing unnecessary details such as insides of buildings, combining pieces together and generally cleaning up before I start working in proper details and set pieces


Saturday, January 15, 2011
A Brief History of Rigging
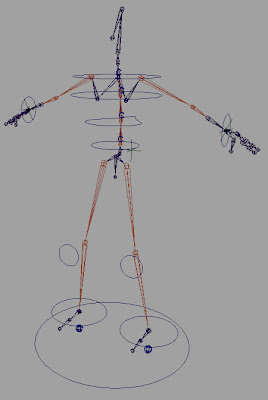
Hello again, second blog post of the day so I'm feeling pretty good as I don't feel like I'm neglecting the blog as much as I usually do. Anyway this is the blog post on the history of my character rigs, and what I learnt making each one, that I mentioned I would be posting. This does mean the the rig I've been working on since wednesday evening is now finished, next step skin it up to the character and see if it really works. So without further a do, in chronological order the four rigs I have make thus far for the game project. I apologize in advance for the fact that the pictures arent terribly exciting theres only so many ways the layout of the joints are going to change, but at least the controllers become more colourful/interesting in shape towards the end. Spine was controlled with an ik spline, a feature that remained all the way up until rig version four, this differs from an ik handle. The spline created a nurbs curve, the cv's of which could be moved to change the shape of the back, so I attached deformers to the cv's and then controllers to the deformers. However the issue that I eventually realised was the problem with this method was that you end of using translate to change the shape of the spine instead of it rotating cause a realistic roll, which I attempted to recreate in the final rig version.
Rig Version 1
This was very much my first forray into rigging, well properly anyway during introduction to digital I did experiment with joints and ik handles trying to make a robots arm strum a guitar. The main features of this rig was an ik handle with pole vector to control the legs, with the pole vector controlling the knee. This I did right and will remain in all of the future rigs that I am talking about. Legs are definately something you want to move with iks, you just grab the controller at the ankle and move it and the knee moves in response, then the pole vectors there if the character needs a little tweak. Feet however used a method that was incredibly basic and didnt make it any further than rig version one, however it did start to teach me set driven key and how to put limits on controllers which were useful lessons to learn. The way this little controller underneath the foot worked was that you would move the foot forward or backward to change the rotation of the foot between two point (30 and -30 degrees I think). This was simple but worked, however it was clear from animator feedback that they wanted a realistic looking footroll so I set out to find out how to do that. The head and neck had absolutely no ways of being controlled in this rig, a major downside to it, the was later rectified, unsuccessfully several times. Finally the arms, these used an ik handle again, similar to the legs. This method stayed in a few versions of the rig, and half stayed in the final one. In order to try and create a realistic rotation of the wrist from the forearm, created a joint between the elbow and wrist, in order to get the ik to still work from the shoulder to wrist this required a bit of playing around but I got it there. The fingers also had no method of being controlled in this rig other than by manually selecting the joints, I also only had two fingers and a thumb, the theory being that one rig finger could control to real fingers. One of the main flaws of this rig and also several future rigs was that I didnt yet understand joint orientation and that translating individual joints to put them in place caused a serious offsetting of the joints orientation, sometimes causing the rig to move and behave in rather unusual ways.
Rig Version Two
Method of controlling the leg remained the same and successful as ever, win. First major change, footroll, as per animator request I managed to incorporate a foot roll using more set driven key, which I was slowly getting the hang of along with the connection editor. The idea being that the foot controller moving the leg ik also had a custom attribute that controlled foot roll, by scrubbing between different values the foot went from default position to heel angled back, to the ball of the foot on the ground with heel raised, to the bare tip toes on the ground and the rest of the foot in the air. This for a while worked well. Spine rigging method remained the same, I also created a controller that the root joint was parented to which allowed for the character to be moved up and down and also get some hip movement. arms remained fairly similar, they were slightly better oriented in this rig cause for a better movement, however I did a a seperate controller for rotation which cluttered things up quite a bit and made somethings more complicated. Other controller changed include the controllers for the upper body to be different shapes so they could be more easily selected. Finally I include a head controller, and it was a monumental failure. It managed to seperate the head from the hierarchy of the spine meaning when you bent the spine forward the head stayed in the original position forcing you to reposition it by hand making it hard to be accurate and create realistic head movement (we had a lot of rather large head bobbing going on).
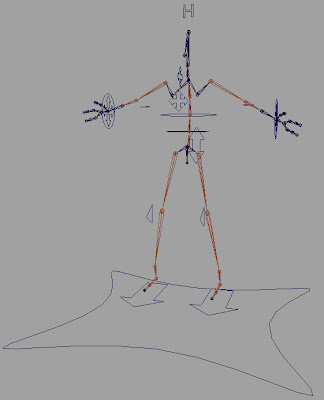
Rig Version Three
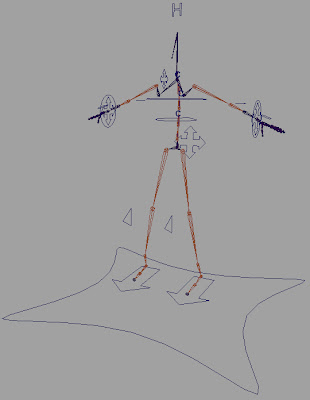
This rig update is a bit shorted as it was never completely finished. I remade a lot of it using the existing working (ish) methods, so same leg and foot set up, although I did want to find a way of creating better control in the foot. The spine and the arm set up remained the same, the big change however was that a) I added the correct number of fingers, and b) I actually found how to control them. So add to the rig a controller over the back of the hand with custom attributes using the connection editor and set driven key to control each fingers individual curling and spreading attributes. After trying many different ways including: constraining. a controller to each joint in the finger (incidently the same method I tried with the head, no surprises it failed), attempting to using ik handles, ik splines, and probably more crazy things out of sheer desperation, it was a huge relief to finally crack how to animate fingers. I was also going to try and resolve the head issues in this rig but it was towards the end of this rig when I found some very good tutorials by Dennis Jenson that suggested some far better methods for stuff I had previously done. So instead of messing around with the head some more then skinning the rig only to discover it didnt work as well was the next one would I thought I would just move straigh on and save myself some time.
Rig Version Four
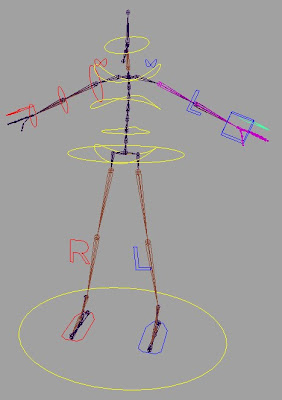
Leg method remained the same. The foot changed quite a lot, and uses a reverse foot lock method I saw at the same time as I learnt the foot roll method of rigs two and up, however this reverse foot lock also combined custom attributes where as the earlier one I had seen whilst I was very much a rigging beginner didnt seem like it added a lot for how complicated it look. Anyway the foot now moves similarly to befor on each aspect (the heel roll, toe roll, and ball roll) all have way for control and also move in several other ways. The spine know uses a few simple controllers, one for the hips, and three for the spine until the shoulders, which have simple orient constraints allowing for a good spine roll, but also have roughly 2 or three joints between each controller, but whereas before I would have put a controller on each joint because I didnt know how to control joints inbetween, this time I used a multiply node to spread the rotation from each controller over several joints. The head and neck used one controller, a simple ik handle from neck to the head and an orient constraint allowing for accurate movement and rotation, but also that the head was still moved by the spine. The arms were an area of big change, out with the seperate forearm joint, as altho in principle it worked well, the low poly game characters mesh suffered from some bad twisting deformation, and problem that could only really be solved by having enough polys to accurately reproduce the flow of the muscles in the forearm. The arm was know controlled using two sets of controls, ik and fk, the ik allowing for quick movements of the arm into position and tweaking with the pole vector at the elbow but the fk allowing for moving of joints one by one down the hierarchy for difficult and more detail armed posing. I also made the controllers much easily to select and differentiate between what does what with colour codes, red for right side, blue for left, and yellow for central.
Sorry for the sheer epicness of this post, if nothing else its for assessment purposes when deadlines roll around and I can actually say yea I learnt a lot.
Rig Version 1
This was very much my first forray into rigging, well properly anyway during introduction to digital I did experiment with joints and ik handles trying to make a robots arm strum a guitar. The main features of this rig was an ik handle with pole vector to control the legs, with the pole vector controlling the knee. This I did right and will remain in all of the future rigs that I am talking about. Legs are definately something you want to move with iks, you just grab the controller at the ankle and move it and the knee moves in response, then the pole vectors there if the character needs a little tweak. Feet however used a method that was incredibly basic and didnt make it any further than rig version one, however it did start to teach me set driven key and how to put limits on controllers which were useful lessons to learn. The way this little controller underneath the foot worked was that you would move the foot forward or backward to change the rotation of the foot between two point (30 and -30 degrees I think). This was simple but worked, however it was clear from animator feedback that they wanted a realistic looking footroll so I set out to find out how to do that. The head and neck had absolutely no ways of being controlled in this rig, a major downside to it, the was later rectified, unsuccessfully several times. Finally the arms, these used an ik handle again, similar to the legs. This method stayed in a few versions of the rig, and half stayed in the final one. In order to try and create a realistic rotation of the wrist from the forearm, created a joint between the elbow and wrist, in order to get the ik to still work from the shoulder to wrist this required a bit of playing around but I got it there. The fingers also had no method of being controlled in this rig other than by manually selecting the joints, I also only had two fingers and a thumb, the theory being that one rig finger could control to real fingers. One of the main flaws of this rig and also several future rigs was that I didnt yet understand joint orientation and that translating individual joints to put them in place caused a serious offsetting of the joints orientation, sometimes causing the rig to move and behave in rather unusual ways.

Rig Version Two
Method of controlling the leg remained the same and successful as ever, win. First major change, footroll, as per animator request I managed to incorporate a foot roll using more set driven key, which I was slowly getting the hang of along with the connection editor. The idea being that the foot controller moving the leg ik also had a custom attribute that controlled foot roll, by scrubbing between different values the foot went from default position to heel angled back, to the ball of the foot on the ground with heel raised, to the bare tip toes on the ground and the rest of the foot in the air. This for a while worked well. Spine rigging method remained the same, I also created a controller that the root joint was parented to which allowed for the character to be moved up and down and also get some hip movement. arms remained fairly similar, they were slightly better oriented in this rig cause for a better movement, however I did a a seperate controller for rotation which cluttered things up quite a bit and made somethings more complicated. Other controller changed include the controllers for the upper body to be different shapes so they could be more easily selected. Finally I include a head controller, and it was a monumental failure. It managed to seperate the head from the hierarchy of the spine meaning when you bent the spine forward the head stayed in the original position forcing you to reposition it by hand making it hard to be accurate and create realistic head movement (we had a lot of rather large head bobbing going on).

Rig Version Three
This rig update is a bit shorted as it was never completely finished. I remade a lot of it using the existing working (ish) methods, so same leg and foot set up, although I did want to find a way of creating better control in the foot. The spine and the arm set up remained the same, the big change however was that a) I added the correct number of fingers, and b) I actually found how to control them. So add to the rig a controller over the back of the hand with custom attributes using the connection editor and set driven key to control each fingers individual curling and spreading attributes. After trying many different ways including: constraining. a controller to each joint in the finger (incidently the same method I tried with the head, no surprises it failed), attempting to using ik handles, ik splines, and probably more crazy things out of sheer desperation, it was a huge relief to finally crack how to animate fingers. I was also going to try and resolve the head issues in this rig but it was towards the end of this rig when I found some very good tutorials by Dennis Jenson that suggested some far better methods for stuff I had previously done. So instead of messing around with the head some more then skinning the rig only to discover it didnt work as well was the next one would I thought I would just move straigh on and save myself some time.

Rig Version Four
Leg method remained the same. The foot changed quite a lot, and uses a reverse foot lock method I saw at the same time as I learnt the foot roll method of rigs two and up, however this reverse foot lock also combined custom attributes where as the earlier one I had seen whilst I was very much a rigging beginner didnt seem like it added a lot for how complicated it look. Anyway the foot now moves similarly to befor on each aspect (the heel roll, toe roll, and ball roll) all have way for control and also move in several other ways. The spine know uses a few simple controllers, one for the hips, and three for the spine until the shoulders, which have simple orient constraints allowing for a good spine roll, but also have roughly 2 or three joints between each controller, but whereas before I would have put a controller on each joint because I didnt know how to control joints inbetween, this time I used a multiply node to spread the rotation from each controller over several joints. The head and neck used one controller, a simple ik handle from neck to the head and an orient constraint allowing for accurate movement and rotation, but also that the head was still moved by the spine. The arms were an area of big change, out with the seperate forearm joint, as altho in principle it worked well, the low poly game characters mesh suffered from some bad twisting deformation, and problem that could only really be solved by having enough polys to accurately reproduce the flow of the muscles in the forearm. The arm was know controlled using two sets of controls, ik and fk, the ik allowing for quick movements of the arm into position and tweaking with the pole vector at the elbow but the fk allowing for moving of joints one by one down the hierarchy for difficult and more detail armed posing. I also made the controllers much easily to select and differentiate between what does what with colour codes, red for right side, blue for left, and yellow for central.

Sorry for the sheer epicness of this post, if nothing else its for assessment purposes when deadlines roll around and I can actually say yea I learnt a lot.
Non linear Animation Test
I was hoping to have finished final rig (for now at least) and subsequently right a post on the different rigging I've been working with, however the rig is in a nearly there state of a completion I'm just ironing out problems and building the right arm. However I wanted to test out a method of animation that I had planned for us to use on the game project to create nice easily to access character animation sheets. The theory being that all the animations for each character would be created and put into one easy to access maya file or converted into fbx for a straight import to the game engine. Seemingly the best way to do this would be to use something called the trax editor in maya, and a combination of character sets, poses/animation and trax. Essentially what this process required was for us to select the characters rig and whatever the key frames where being assigned to, in our case a series of nurbs curve based controllers. Then we make a character set for that character, for instance "clip" our main protagonist. Then we animate the piece of animation we want to do next. Animation for games is a bit strange as all the animations are created seperately, but need to make sure they will seemlessly integrate with one another, for instance you will create a walk cycle, a jump on the spot and a jump while the character is moving (everyone whos played games knows you can jump a ridiculously longer distance if you were moving to begin with). But I have gone off point, this means that in a lot of ways it makes sense to make different maya files but the programmers want one file with all the different animations for each character, a problem to overcome. And it turned out to be simple, the trax editor in maya, by saving out pieces of animation for each character set as a clip (a special animation file, it gets confusing explaining whilst talking about a main character also called clip) you can then import all the clips into one scene, and move the animations around. re-order, scale etc the animation as an entire clip rather than its individual keyframe, its like editing lots of clips of video together, this scene can then be saved for the prgrammers to open in the engine and code that when the player presses forward the character will move and the animations between frames 1 and 24 of the walk cycle will be cyled, magic. This video is of a walk cycle made for clip the main character, which I created a character set for, saved the walk animation as a clip and then experimented with duplicating to increase duration, and scaling the length of the clip to slow and speed up the walk.
Untitled from Toby Rutter on Vimeo.
Thursday, January 13, 2011
Rigging
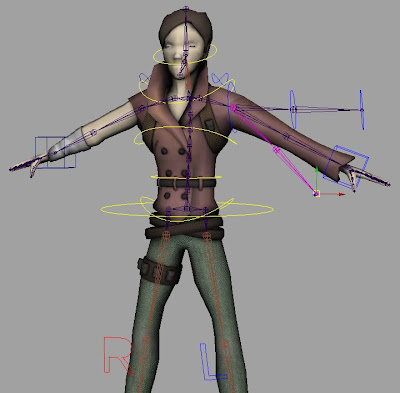
This is the start of my new iniative called stop working for five minutes to actually post updates of the work on my blog, as it has been some what neglected recently. As the title suggests this short post is going to be about the joys of rigging. They way I am writing this may seem laced with sarcasm suggesting that rigging is in fact not a joy to do, anyone who interprets it this way your about half right. I've had a bit of a love hate relationship with said rigging. But as far as I can tell rigging is all about problem solving and that in a lot of ways has been fun, there have been plenty of tearing my hair out moments (the aforemention hate part of the relationship) but it is cool facilitating animators with the ability to make the creations you've built dance around. I am pretty sure that the 3D art and modelling side of the cg pipeline is for me, however I do feel that knowing how to pose a character in maya by implementing a decent rig is a good thing, in fact anything that gets rid of boring t-pose characters is a good thing, for instance transpose in zbrush. But anyway I have digressed a fair bit. Key points, rigging more fun than I thought, I am no rigging/mel scripting genius my rigs have been a combination of tutorials for rigging different body bits that have then been frankensteined together to form a rig, which has resulted in mixed success. That said I think I am at the stage now, on rig version 4 that is should meet all the requirements for this project so I can stop rigging for a bit and go back to the stuff I really enjoy. I am currently rigging the arms and the picture below shows my ik/fk switch arm I am creating, I really like this screen shot because it demonstrates the most complicated and "what the hell is going on there" (thats the expression non riggers have) piece of rigging I can do. My next post in theory will be a quick recap of all the rigs I've built, all four of them, and a bit of analysis, what was good/bad/hilariously bad (you really should see some of the things that rig version 2 did to our skinned characters head and neck, I may make a blooper real style vid documenting it). Anyway thanks for reading if you read this, apologies for use of made up words and stuff spelt inside out etc, this is the general disclaimer that comes with most of my written work.

Sunday, January 2, 2011
Its been a while
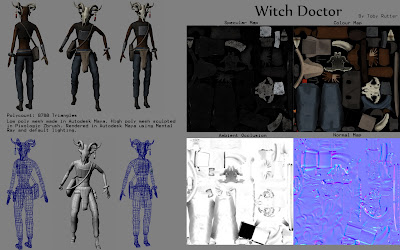
As the title suggests it has been a while since I posted anything on my blog. So merry Christmas and a happy New Year. I am going to use this post to showcase a piece of work I have been doing in my spare time (when not running round like a headless chicken doing uni work and learning things to *fingers crossed* improve uni work), the piece of work was created working to a brief, which required me to create and texture a game character/ vehicle/ or environment. Bearing in mind the restrictions of creating assets for games. I chose to create a game character, and if you've seen any of my previous blog posts you will probably have seen him coming along rather nicely. Recently this project had been forced into the background as my game work for uni has somewhat taken prioty, however with the deadline near the start of january, I decided that even if I did very little else over christmas, I would finish this, and I would finish it well. I am very pleased with the finished result, considering I began using Maya this time last year, and my 3D software experience prior to that was very slim, I feel I have made good progress in a year and hope I can make a similar leap forward by this time next year. However that said there is (as with all finished pieces) plenty I have learnt whilst doing it, and a lot I would approach in a different way next time around. Any feedback will be greatly appreciated, if not for this piece (as the deadline is fast approaching) but for future works that can be improved.

Subscribe to:
Comments (Atom)