Wednesday, December 7, 2011

Beastman Renders

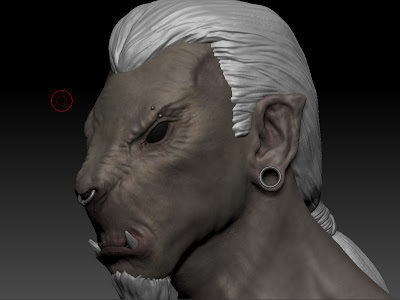
Here are some smaller resolution versions of my final renders, these renders were rendered out of zbrush and are the basic composites from photoshop, I have some much higher resolution composites that are the finished versions, but they are a bit big to upload. I'm a bit to close to this piece of work to do very deep evaluations right now. Overall I am pleased with it, the creature model itself is definitely pushing my modelling skills to a higher level which is always good. The texturing pipeline was a new one that I hadn't worked with before but was very rewarding and gets fantastic results for skin. I am now a lot more familiar with zbrush layers, and the spotlight photo texturing feature. The main areas I am unhappy with in this sculpt are the modelling and texturing of the hair, and the texturing of the eyes. Solid geometry is never going to look as good as alpha planed hair, and when I create the game resolution version of this character I will create alpha hair, and I'm sure I will be able to achieve some really nice results in engine. So whilst I'm unhappy about the hair in this model I don't think it detracts too much and at least I know where to go from here and how to improve that for the next model. The texturing of the eyes was another area I think let the model down, I wasn't able to get the right balance of a nice shiny specular with hints of environment/HDRI style reflections in the eyes to really give that realistic feel. I also should have spent more time designing the eyes, and looking at different animal reference for ideas. That's a broad evaluation of the model, when I've managed to let everything settle I will perform a more in depth post mortem no doubt.


Tuesday, December 6, 2011

Hair Test

Hair has been causing me numerous problems recently. I knew modelling the hair that I wasn't going to be able to adopt the approach of using lots of alpha mapped planes which is the standard approach for creating in game hair. This was due to rendering constraints within zbrush. So I opted to create essentially place holder hair in the form of solid geometry. This has already taken two separate sculpts to get it looking as it does presently and its still a long way from being good. But as solid place holder geo it all right. My main issue with it is when it comes to the texturing. I've tried texturing with poly paint and using high res hair textures and spot light. Neither of these methods have yielded anything I've really wanted to use. In this screenshot I've just painted strands quickly into lightened areas in photoshop and done some colour correction to the darker colour I wanted the hair to be. This is looking like the most appealing solution right now as it's giving passable results. There would be options I could use if I was rendering out of maya or max but it would require me setting up identical cameras and generally faffing around a lot.

Expression Tests

I've been starting to pose the model create some expressions. This has been going well and I'm really feeling like this project is finally coming to a close. The hair still needs to be textured up, maybe you can tell that I'm procrastinating from that a lil bit. I'm quite pleased with a lot of these shots, although they will need to be worked into a bit more. I'm finding it quite hard to adapt the research I've done into human facial expressions into this model. Which isn't unexpected due to his very different facial structure. His face shape lends itself, as with his character, to more aggressive expressions. And due to his more prominent lower jaw, the corners of the mouth don't move up well. Animals seem to convey more with the language of their body as a whole, whereas people are cable of conveying emotion with very slight facial indicators. Where I to go back and redo this project knowing I would be adapting quite an animalistic character as my final piece I would have done more research into animal faces, for instance how dogs look when they are happy, sad, etc. The centre image is the face at the default position I sculpted it, which I feel is quite a neutral pose for the character. The fourth from the left is by far my favourite, the shouting pose works so well with the character. The closest to the right is the least aggressive and although its subtle I think really works, I think the position of the head makes him look proud. An the lowering of the corners of the mouth demonstrates that it looks more natural when the corners of this mouth move down rather than up due to the construction of his jaw/teeth. The closest to the left is the best happy expression so far, I'm attempting to create a snarly/smirk using one corner of the mouth. I think this is on the right track but needs to be more exaggerated in order to read well. Originally I was thinking of doing six renders but there is a nice symmetry to five. Also a lot of the major human expressions I conveyed through how you can see the eyes. In my experiments so far the animal eyes I've give are not expressing in the same way, and to him give pupils is going to be quite strange due to the position of the eye, I think he might look constantly cross eyed.

Test Render

Recurring theme, yet another test render, this is much closer to the kind of result I want on the final renders. The shadows are a bit intense for my liking and that will be an area to tweak. The hair also has a large specular component which is something I want to remove in zbrush. However if I can't get a good look for the hair I can always make adjustments in the composition in photoshop. It's always going to be hard to get wax shaders to create good looking hair, my aim for the hair is just to make sure it's not detracting or pulling too much attention away from the rest of the image. I have a very faint sss component on this render and its helping to add a lot of life to the skin. On the final renders I'm going to improve areas like the high reflectivity on the piercings by creating masks per subtool allowing me to isolate areas such as the eyes or hair etc and tweak them individually.

Monday, December 5, 2011

Test Render

This is my second test render, which shows a massive improvement since the first test render. This is down to a few setting tweaks, and some experimenting with how I composite the layers together in photoshop. The model itself is nearing completion, slowly but surely, the hair still needs to be re-textured, but the inside of the mouth is all done now. I've started to pose a scream/howl expression for the character, partly to get the ball rolling on posing him and partly out of necessity to paint the interior of the mouth. So bearing in mind there are some tweaks to the pose I will be doing I don't think this is looking to bad. The render is missing some specular passes that I will do one the final ones as well as a subsurface scatter pass to really bring together the skin texture. I'm also going to use environment reflections to compliment the spec with the eyes. In the final render I want to tone down some of the harshness in the shadows as I can always build them up through layering in photoshop. Overall there's still a big list of things to do, I would still like to get some form of tattoo or war paint on the model, to add some more interest to the shoulders. I'm also going to pose him with the head slightly turned to make all the poses feel more dynamic.


Sunday, December 4, 2011

Jawsome

So moving on to texturing the interior of the mouth. I've spent a lot time over the last day messing around with hair which is still looking fairly static and lego-y. With the deadline fast approaching I've decided to let it be for the moment and it will likely be coming up in the evaluation of things to do better next time. So onwards to the only area that hasn't received any texturing attention yet... the interior of the mouth. This the lower jaw, the upper is just a duplicate of this. I've been trying to strike a balance between spending too long creating beautifully textured gums and just bucket filling them. They probably aren't going to get seen a lot, as I'm probably only going to do one or two open mouth expressions. Even in these expressions a lot of this is probably going to be lost by shadows. Next on my list is to texture the tongue before I go back and texture the upper jaw, it's never fun texturing duplicates so I like to break it up by doing other things. I may also tweak the base colour on the gums to a slightly different colour scheme I haven't decided yet. Once the interior of the mouth is finished I'm going to go through and apply final touches to the skin and eyes.

Friday, December 2, 2011

Sculpting Hair

This has literally had me pulling my hair out. oh dear that's a bad pun and it's probably not going to get much better than that. But more on hair in a second. Today we had the last lecture/tutorial before the assessment for this module. I used the opportunity to demo the progress I had made on this model to the guys and gals at uni and was lucky to get a lot of positive feedback, which is always good for feeding the ego. When I showed the character to the class our lecturer had the class brainstorm the character/personality of this model. This was really good as the vast majority of things people were picking up on are aspects of the character I had designed, with one or two things I will be adding as they were good suggestions. This is really pleasing as it means my art is portraying its character well and is easy enough to read.
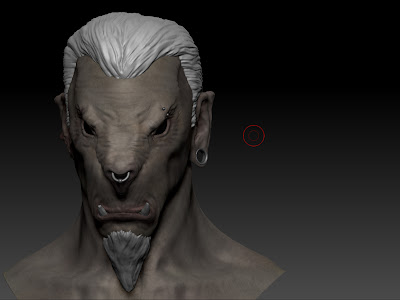
There were only a few feedback points that came out of the section, it was suggested the teeth were a bit too symmetrical still, so I've taken a moment to alter the shape of one and chip the end of the other, simple stuff but it helps to break up the symmetry in the face. The major area that definitely needs work is the hair, hence this post. I was having a really hard time polypainting the hair and the feedback today highlighted that more work just needs to be done.
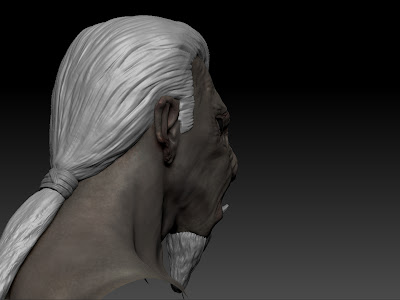
The first thing I did was clone my original hair subtool, I didnt want to lose any of the previous work. I've then just smoothed everything else and started again basically and already I'm much happier with it. I'm going to keep sculpting into the hair and then use zpsheres to create some messy strands that will move aways from the head, particularly down the back, although I'm unlikely to be taking a lot of renders from the back I don't want one area of the sculpt to feel neglected. Once I've sculpted the hair to a level I'm satisfied with I'm going to re-topologise the mesh, as I've done with all the meshes I've made using dynamesh. Having an even topology makes a big difference when it comes to using polypaint. It is also quite likely that I will need to uv the hair and beard and use photoshop to get a really good result in the texturing. Polypaint works fantastically for skin but I've got a lot of options with texturing overlays in photoshop.